【Kotlin】Android Studioで画像(XML/PNG/JPG)を取り込んで表示させる方法!ImageView

この記事からわかること
- Android Studioで画像を取り込む方法
- XML/PNG/JPG/形式
- ImageViewの使い方
- ボタンクリックで表示させる方法
- デモプレビューに表示させる方法
index
[open]
\ アプリをリリースしました /


環境
- Android Studio:Flamingo
- Kotlin:1.8.20
Android Studioに画像を取り込んで表示させる方法をまとめていきます。
Android Studioに画像を取り込んで表示させる方法
Android Studioにアプリ内で使用する画像を取り込んで表示させるには「app」>「res」>「drawable」の中に該当の画像をドラッグ&ドロップすればOKです。画像形式はXML/PNG/JPGどれでも対応していそうです。

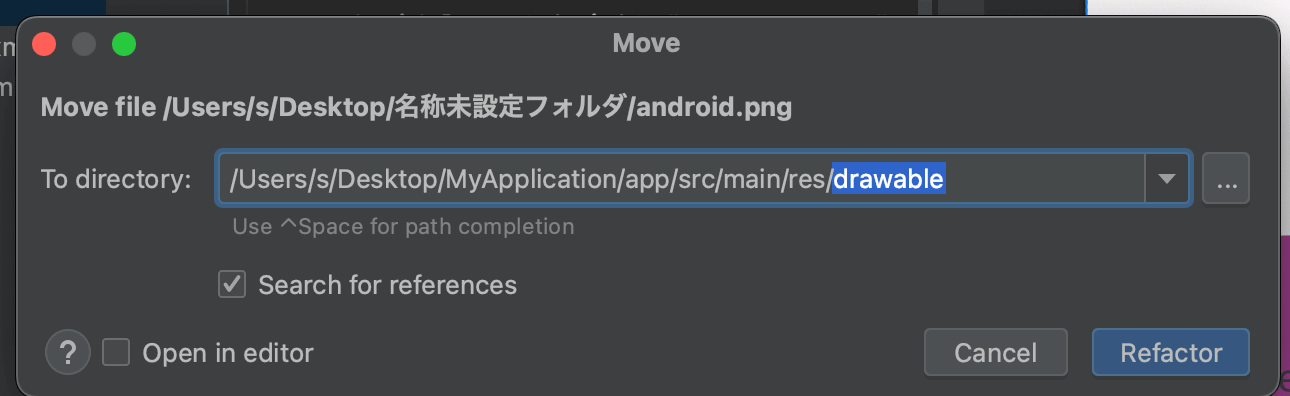
ドラッグ&ドロップの際に「drawable」目掛けてドロップしないと正常に入れ込むことができなかったので注意してください。ドロップできると以下のポップアップ(Move)が表示されるので「Refactor」をクリックすれば完了です。
また入れ込む際の注意点として端末の解像度に違いによって画像がぼやけたりしないようにすることも可能です。詳細は以下の記事を参考にしてください。
ImageViewを使用して表示させる
表示させるためにはImageViewを使用します。表示する画像は属性android:srcで指定します。「drawable」ディレクトリ内にある画像ファイルには@drawable/ファイル名で参照することができます。
<ImageView
android:id="@+id/image"
android:layout_width="wrap_content"
android:layout_height="wrap_content"
android:src="@drawable/android"
app:layout_constraintBottom_toBottomOf="parent"
app:layout_constraintEnd_toEndOf="parent"
app:layout_constraintStart_toStartOf="parent"
app:layout_constraintTop_toTopOf="parent"
/>
ボタンをクリックで動的に画像を表示する
最初から画像を表示させるのではなく、ボタンをクリックした時に画像を表示するように変更してみます。まずはButtonを追加してImageViewの下に配置し、ImageViewのandroid:srcを一度削除しておきます。
<ImageView
android:id="@+id/image"
android:layout_width="416dp"
android:layout_height="233dp"
app:layout_constraintBottom_toBottomOf="parent"
app:layout_constraintEnd_toEndOf="parent"
app:layout_constraintHorizontal_bias="0.6"
app:layout_constraintStart_toStartOf="parent"
app:layout_constraintTop_toTopOf="parent"
app:layout_constraintVertical_bias="0.453" />
<Button
android:id="@+id/button"
android:layout_width="wrap_content"
android:layout_height="wrap_content"
android:text="@string/button_label"
app:layout_constraintTop_toBottomOf="@id/image"
app:layout_constraintStart_toStartOf="parent"
app:layout_constraintEnd_toEndOf="parent"
app:layout_constraintBottom_toBottomOf="parent"
/>
次にMainActivity.ktからボタンをクリックした時の処理を追加します。ImageViewを取得したらsetImageResourceメソッドを呼び出して対象のリソースを渡します。
import androidx.appcompat.app.AppCompatActivity
import android.os.Bundle
import android.widget.Button
import android.widget.ImageView
class MainActivity : AppCompatActivity() {
override fun onCreate(savedInstanceState: Bundle?) {
super.onCreate(savedInstanceState)
setContentView(R.layout.activity_main)
var image:ImageView = findViewById(R.id.image)
val button:Button = findViewById(R.id.button)
button.setOnClickListener {
image.setImageResource(R.drawable.android)
}
}
}
これでボタンをクリックすると画像が表示されるようになりました。

また画像だけでなくマテリアルアイコンを表示させることもできます。使い方に関しては以下の記事を参考にしてください。

Android Studio内でのデモプレビューのみ切り替える
この場合Android Studio内のデモプレビューではクリック後に表示される画像が空白の状況なのでわかりやすいようにAndroid Studio内のデモプレビューでのみ表示するtools:src=@drawable/ファイル名を追加します。
<ImageView
android:id="@+id/image"
android:layout_width="416dp"
android:layout_height="233dp"
tools:src="@drawable/android"
app:layout_constraintBottom_toBottomOf="parent"
app:layout_constraintEnd_toEndOf="parent"
app:layout_constraintHorizontal_bias="0.6"
app:layout_constraintStart_toStartOf="parent"
app:layout_constraintTop_toTopOf="parent"
app:layout_constraintVertical_bias="0.453"
/>
まだまだ勉強中ですので間違っている点や至らぬ点がありましたら教えていただけると助かります。
ご覧いただきありがとうございました。