【Kotlin/Android Studio】Fragmentを動的に切り替える方法!replaceメソッド

この記事からわかること
- Android Studio/KotlinでFragmentを動的に切り替える方法
- supportFragmentManagerのreplaceメソッドの使い方
index
[open]
\ アプリをリリースしました /


環境
- Android Studio:Flamingo
- Kotlin:1.8.20
Fragmentを動的に切り替える方法
Kotlinでボタンのタップなどで動的に表示しているFragmentを切り替えるにはsupportFragmentManagerのreplaceメソッドを使用します。
supportFragmentManager.beginTransaction().apply {
    replace(R.id.main_frame, FirstFragment())
    addToBackStack(null)
    commit()
}
実装サンプル
実際にボタンのタップでFragmentが切り替わるコードを実装してみます。
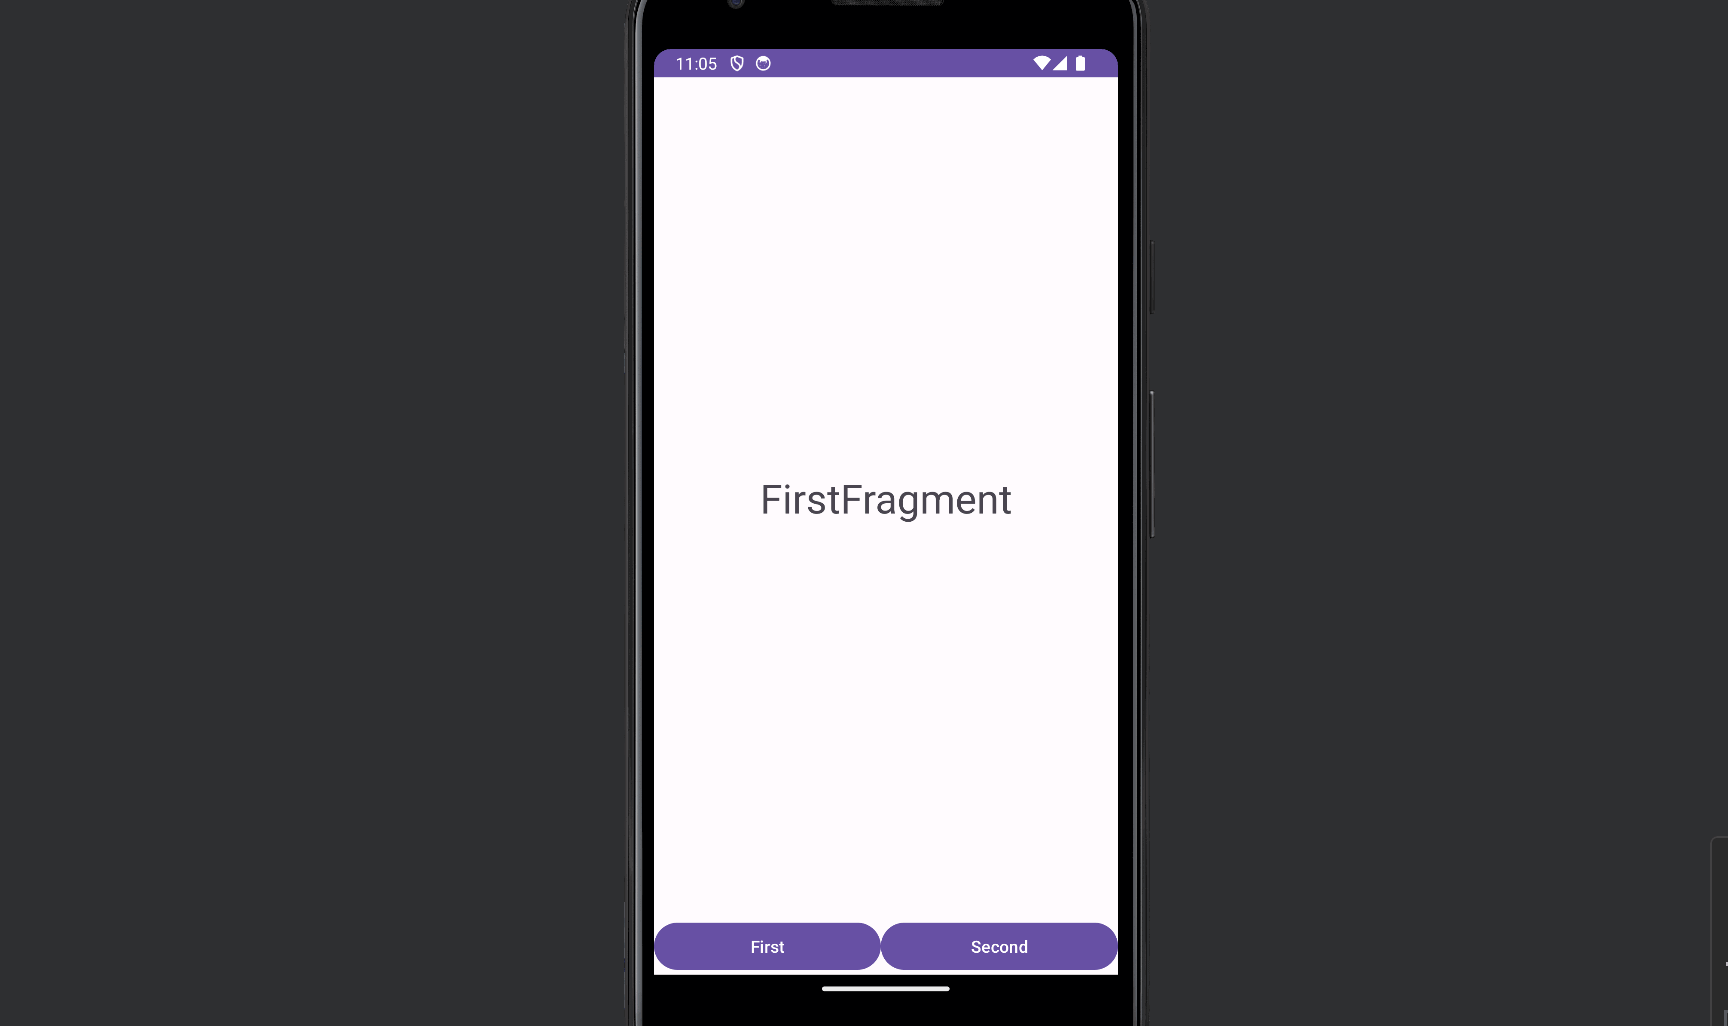
まずはレイアウト側にFragmentを表示させるためのFrameLayoutと2つのボタンを用意します。
<?xml version="1.0" encoding="utf-8"?>
<androidx.constraintlayout.widget.ConstraintLayout xmlns:android="http://schemas.android.com/apk/res/android"
xmlns:app="http://schemas.android.com/apk/res-auto"
xmlns:tools="http://schemas.android.com/tools"
android:layout_width="match_parent"
android:layout_height="match_parent"
android:id="@+id/container"
tools:context=".MainActivity">
<FrameLayout
android:id="@+id/main_frame"
android:layout_width="match_parent"
android:layout_height="wrap_content"
app:layout_constraintBottom_toTopOf="@+id/linearLayout"
app:layout_constraintEnd_toEndOf="parent"
app:layout_constraintStart_toStartOf="parent"
app:layout_constraintTop_toTopOf="parent">
</FrameLayout>
<LinearLayout
android:id="@+id/linearLayout"
android:layout_width="match_parent"
android:layout_height="wrap_content"
android:orientation="horizontal"
app:layout_constraintBottom_toBottomOf="parent"
app:layout_constraintEnd_toEndOf="parent"
app:layout_constraintHorizontal_bias="0.0"
app:layout_constraintStart_toStartOf="parent">
<Button
android:id="@+id/first_button"
android:layout_width="wrap_content"
android:layout_height="wrap_content"
android:layout_weight="1"
android:text="First" />
<Button
android:id="@+id/second_button"
android:layout_width="wrap_content"
android:layout_height="wrap_content"
android:layout_weight="1"
android:text="Second" />
</LinearLayout>
</androidx.constraintlayout.widget.ConstraintLayout>
ロジック部分では以下のようにボタンがタップされた際にFragmentが切り替わるようにしています。
class MainActivity : AppCompatActivity() {
override fun onCreate(savedInstanceState: Bundle?) {
super.onCreate(savedInstanceState)
setContentView(R.layout.activity_main)
val firstBtn: Button = findViewById(R.id.first_button)
val secondBtn: Button = findViewById(R.id.second_button)
firstBtn.setOnClickListener{
supportFragmentManager.beginTransaction().apply {
replace(R.id.main_frame, FirstFragment())
addToBackStack(null)
commit()
}
}
secondBtn.setOnClickListener{
supportFragmentManager.beginTransaction().apply {
replace(R.id.main_frame, SecondFragment())
addToBackStack(null)
commit()
}
}
}
}
まだまだ勉強中ですので間違っている点や至らぬ点がありましたら教えていただけると助かります。
ご覧いただきありがとうございました。