【Kotlin/Android Studio】Fragmentの実装方法と役割!値を渡す方法

この記事からわかること
- Android StudioのFragmentとは?
- Activityとの違い
- Kotlinによる実装方法
- 画面遷移とFragment間で値を渡すには?
index
[open]
\ アプリをリリースしました /


参考文献:公式リファレンス:Fragment
環境
- Android Studio:Flamingo
- Kotlin:1.8.20
Android StudioでAndroidアプリを開発する際にほぼほぼ使用することになるFragment(フラグメント)についてまとめていきます。
Fragment(フラグメント)とは?
Fragment(フラグメント)とは「断片」と言う意味を持つ英単語でありAndroid 3.0(API レベル11)から採用された画面を構築するためのパーツのことを指します。Androidアプリの画面構築のベースとなるのはActivityであり、このベース部分がユーザーと触れ合うためのユーザーインターフェース(UI)を提供しています。
FragmentもActivity同様にUIを提供している機能であり、ベースとなるActivityに紐づく形で存在します。Activityにはライフサイクル(自身の生成→破棄までの流れ)がありますが、Fragmentにも似たようなライフサイクルが存在しActivityよりも細かく状況の変化(生成や読み込みなど)を取得することが可能になっています。またActivityと共存関係にあるので紐づくActivityが停止すればFragmentも停止し、破棄されれば同様にFragmentも破棄されます。
また1つのActivityに複数のFragmentを組み合わせることも可能になっており、Activityが実行中であればFragmentの追加や削除は自由になっており、また再利用可能になっています。
まとめ
- 「断片」という意味
- Android 3.0以降から採用
- 画面を構築するパーツのようなもの
- ユーザーインターフェイスの挙動や部位を表すもの
- ActivityはUI構築のベース部分
- Fragmentは常にActivityにホストされる
- ライフサイクルを持つ
- Activity1つにFragmentを複数組み合わせ可能
- Activityに依存。ライフサイクルも共存
- 再利用可能
実装方法
ではFragmentを実装してみたいと思います。Fragmentを実装する上で登場するものをまとめておきます。Activityクラス(MainActivity.kt)にActivityレイアウト(activity_main.xml)が紐づいているように、FragmentもFragmentクラスとFragmentレイアウトが紐づいています。この段階ではよく分からないかもしれませんがとりあえず4ついるんだなと理解しておきます。
登場人物
- Activityクラス
- Activityレイアウト
- Fragmentクラス
- Fragmentレイアウト
Fragmentを実装するにあたってまずはアプリを起動させた時にActivityの上にFragmentが表示されているようにしたいと思います。
Fragmentを最初に表示する
流れ
- Fragmentクラス/レイアウトの生成
- Fragmentクラス内をリセット
- FragmentレイアウトにTextViewを追加
- ActivityレイアウトにFragmentを設置する場所(FrameLayout)を用意
- android:name="com.example.プロジェクト名.FirstFragment"を付与
- 背景色を追加する
今回のプロジェクトの全体はGitHubに上げていますので参考にしてください。
1.Fragmentクラス/レイアウトの生成
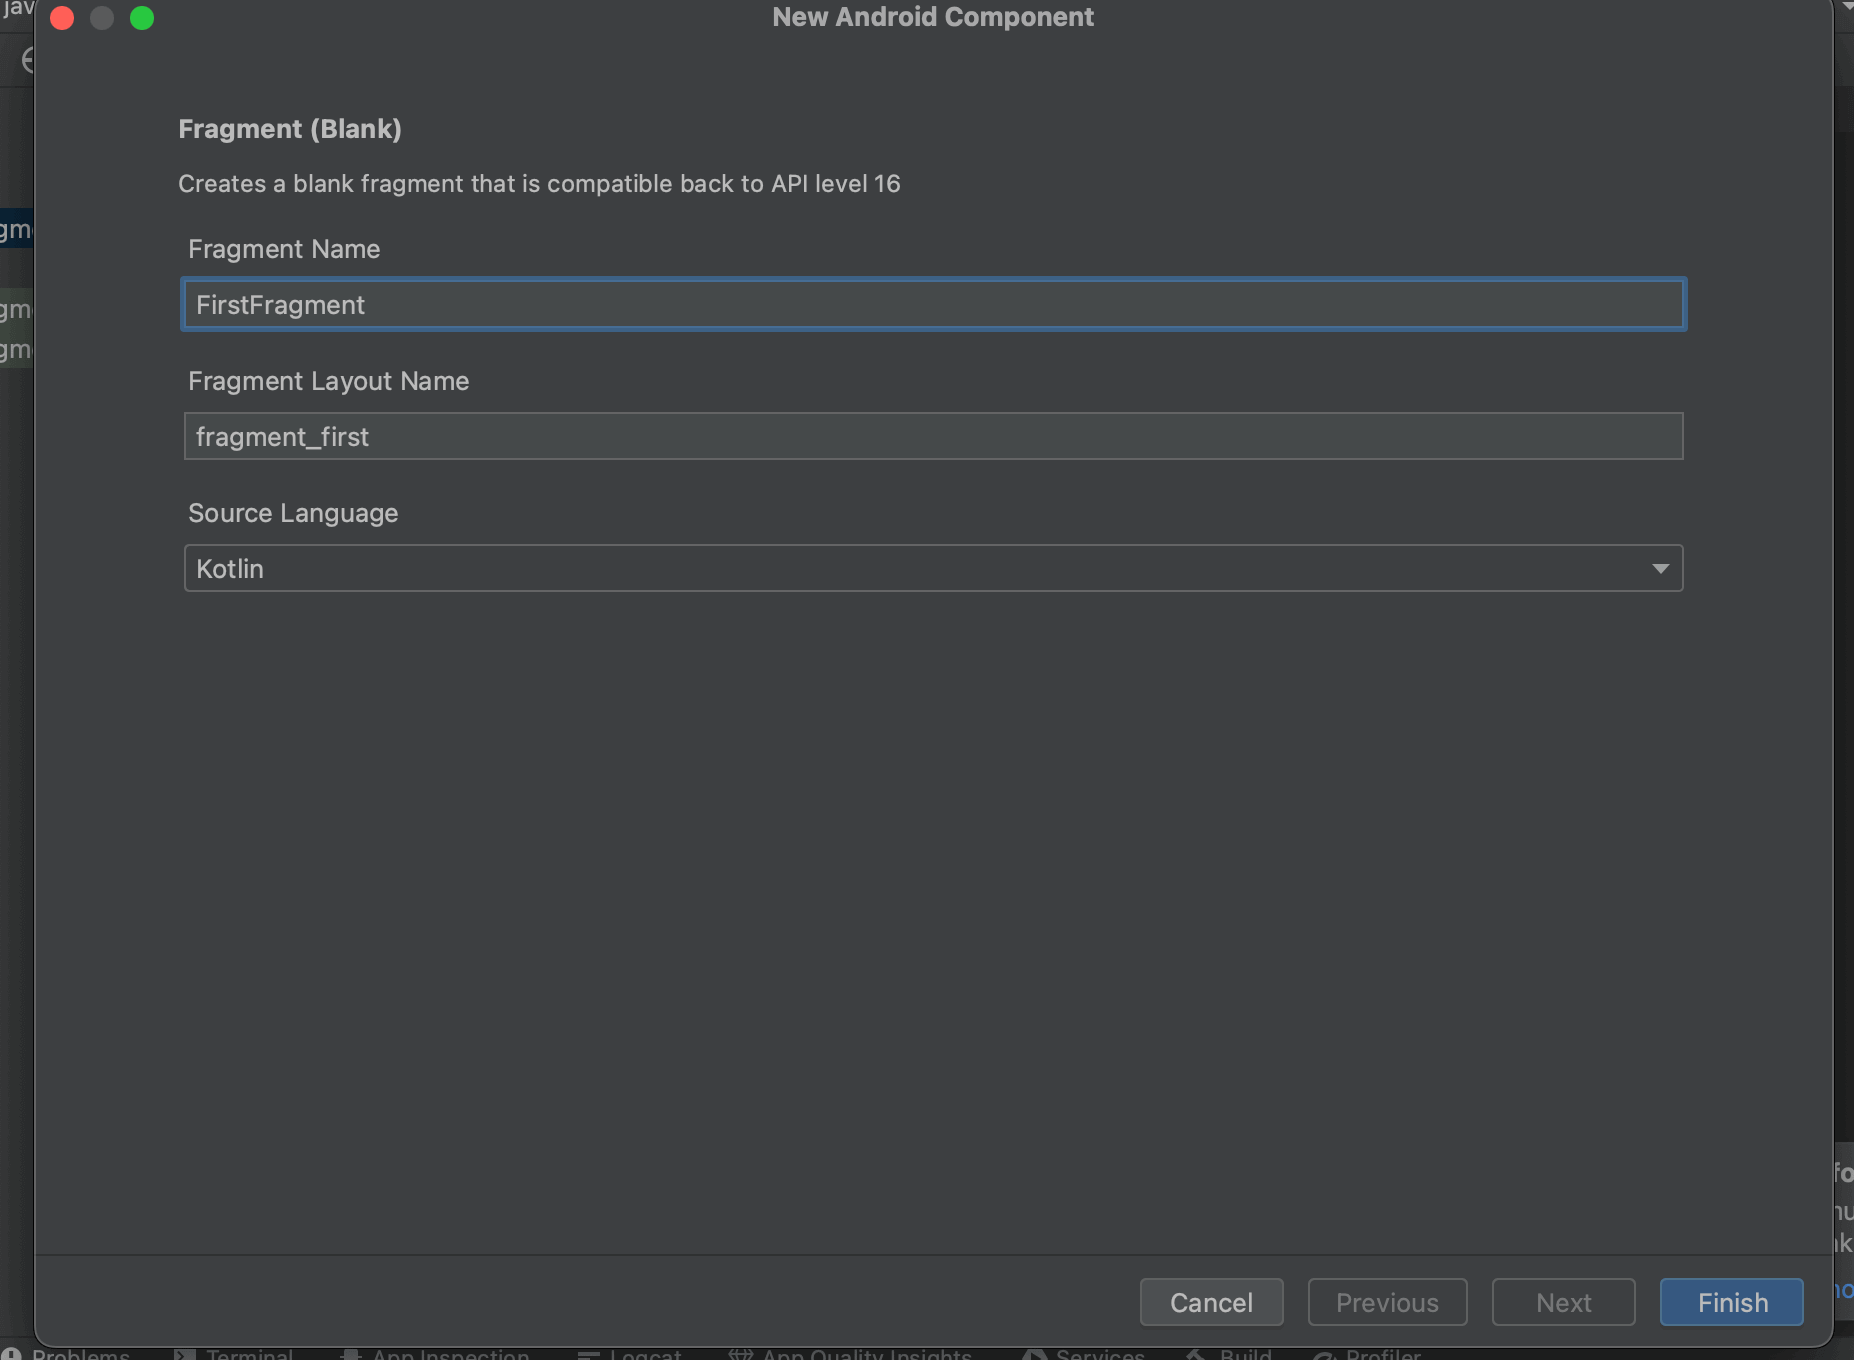
まずはFragmentを扱うためのクラスとレイアウトを生成します。「app」>「java」>「com.example.プロジェクト名」で右クリックして「New」>「Fragment」>「Fragment(Blank)」もしくは「Gallery...」>「Fragment(Blank)」をクリックします。

Fragment NameにFirstFragmentと入力すると自動でレイアウトファイル名をfragment_firstに変更してくれるので「Finish」を押して生成します。
2.Fragmentクラス内をリセット
生成されたFirstFragmentクラスを開くと色々とあらかじめ記述されているので一度不要な処理を削除し以下の状態にしておきます。
class FirstFragment : Fragment() {

    override fun onCreateView(
        inflater: LayoutInflater, container: ViewGroup?,
        savedInstanceState: Bundle?
    ): View? {
        // Inflate the layout for this fragment
        return inflater.inflate(R.layout.fragment_first, container, false)
    }
}ここに載っているonCreateViewメソッドがFragmentのライフサイクルの1つです。この中では,レイアウトとクラスを紐づける処理(インフレート)が実装されています。
3.FragmentレイアウトにTextViewを追加
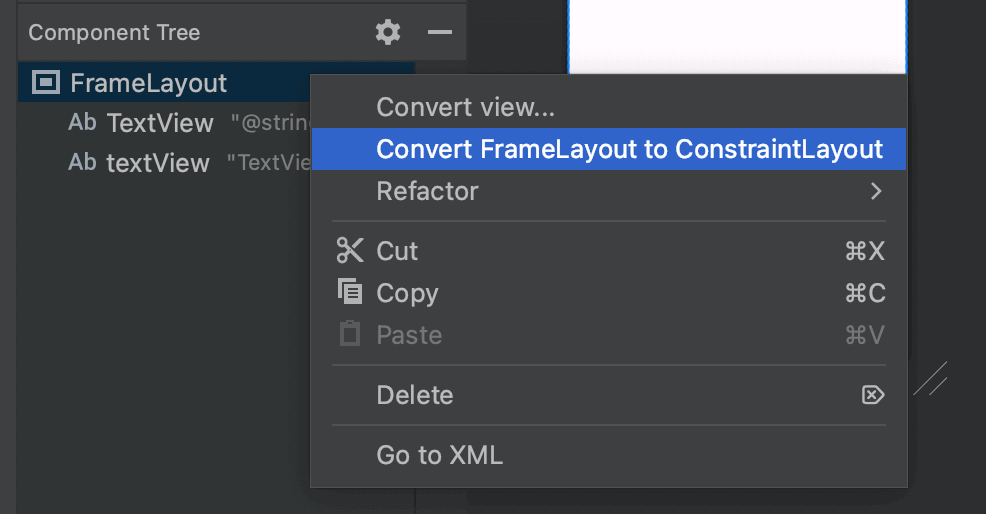
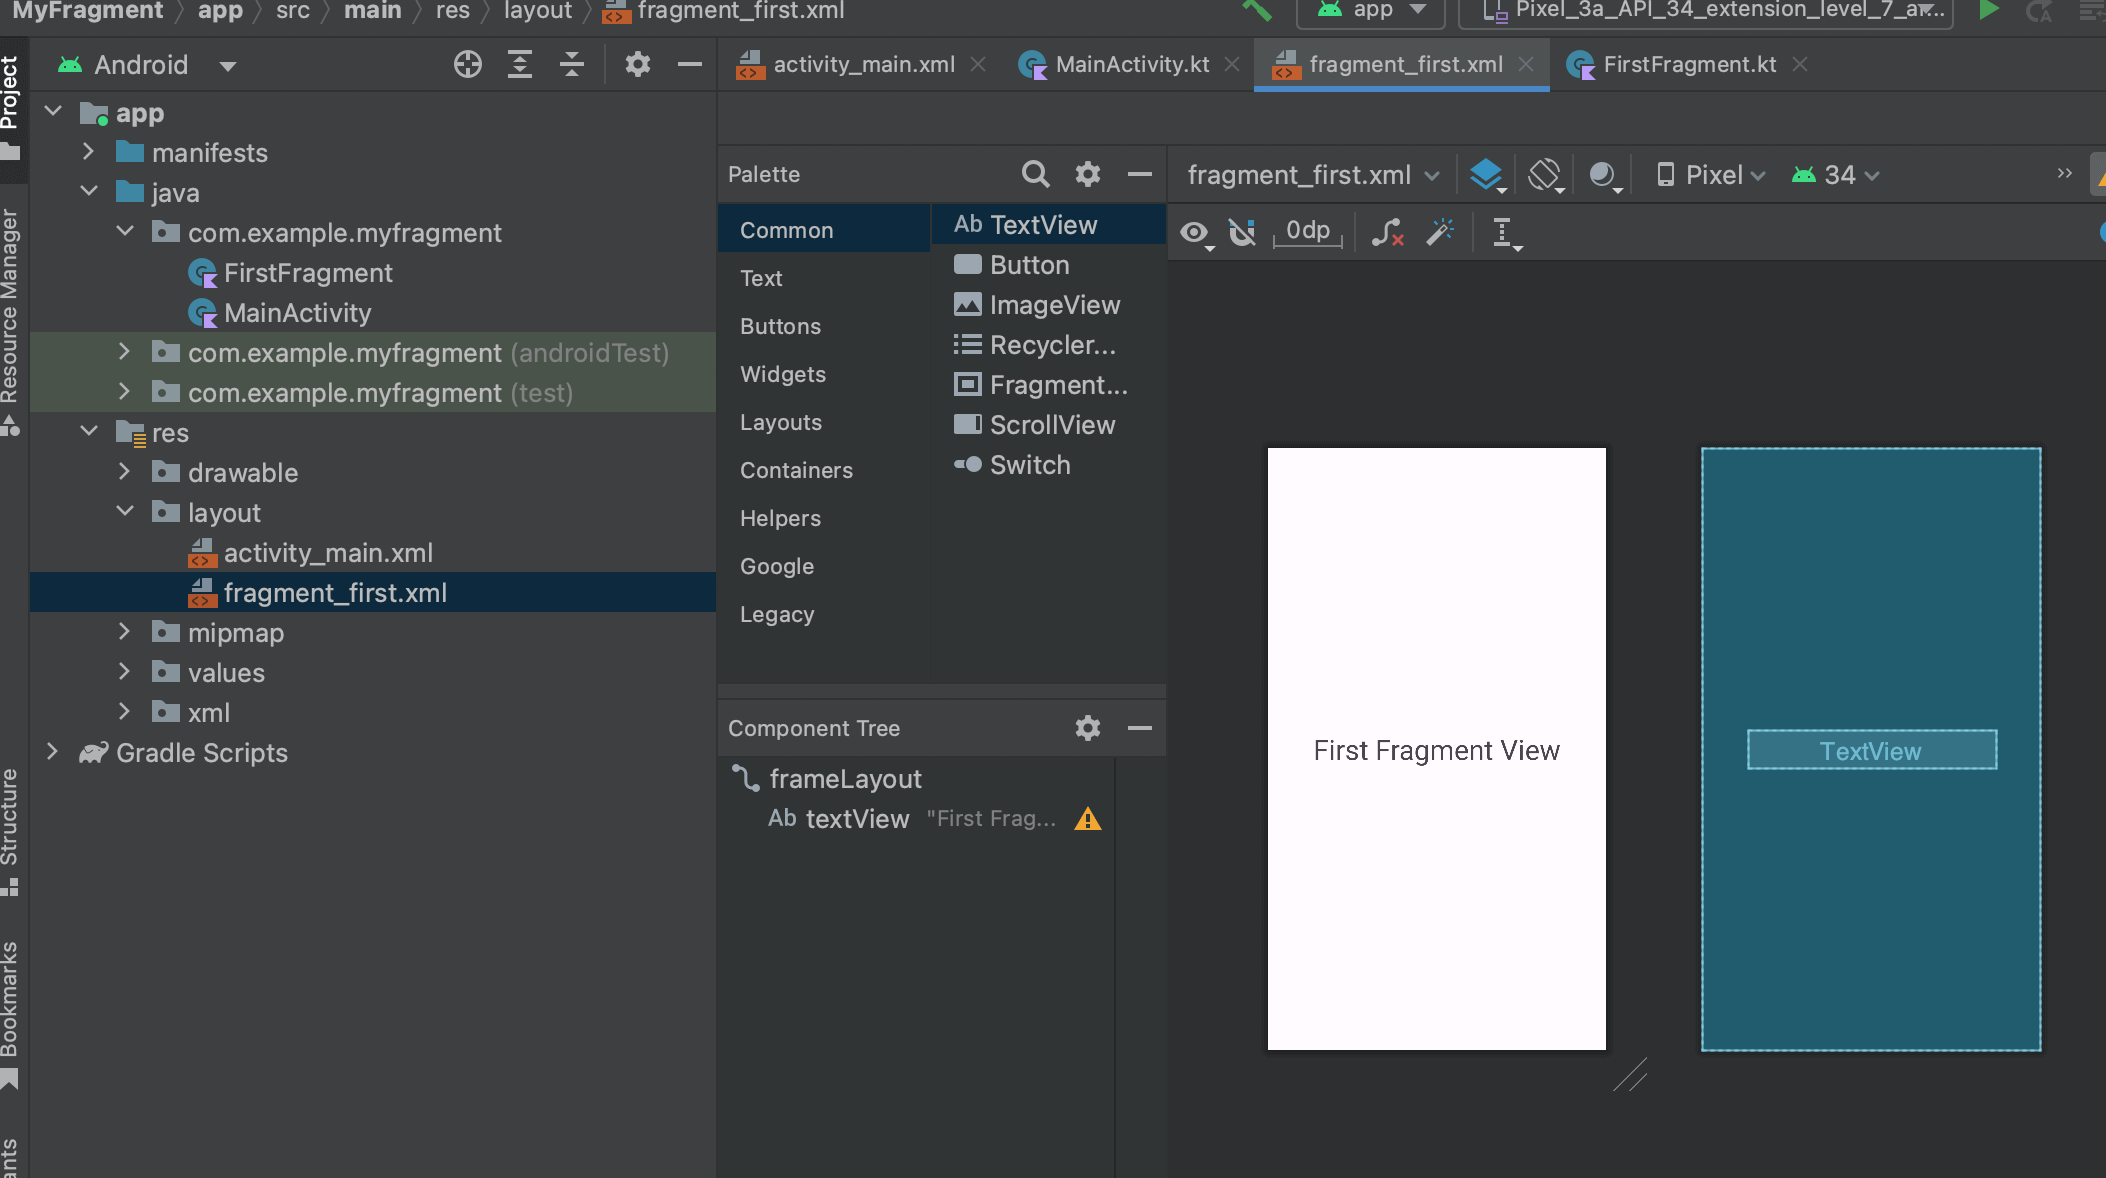
続いてFragmentレイアウトに識別しやすいようにTextViewを追加しておきます。fragment_first.xmlを「Design」タブで開きます。追加する前に以下の部分から「Convert FrameLayout to ConstraintLayout」をクリック、ポップアップが表示されるがそのままクリックしてxmlの大枠をConstraintLayoutに変更しておきます。
それができたらTextViewを追加し、配置やサイズなどを適当に調整しテキストに「First Fragment View」を渡しておきます。
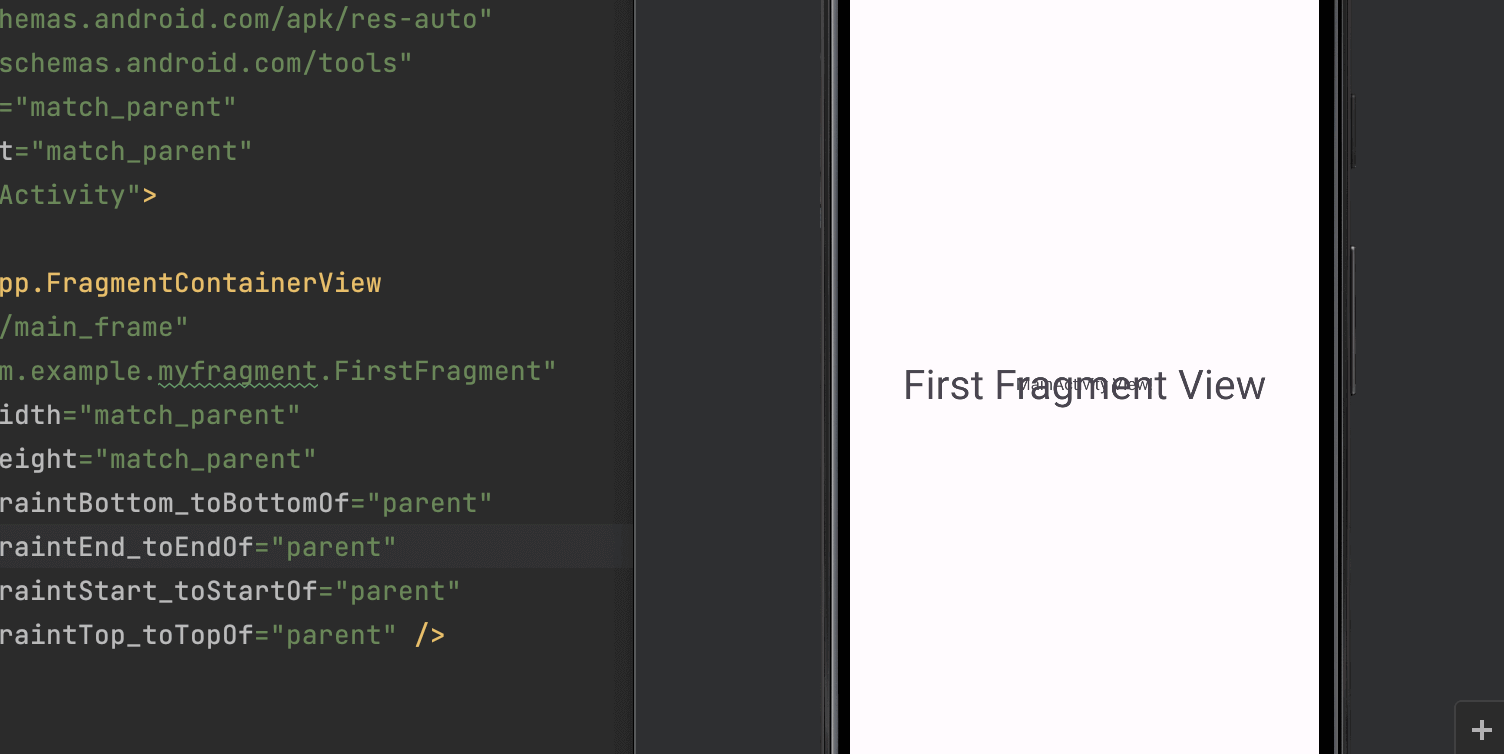
4.ActivityレイアウトにFragmentを設置する場所(FrameLayout)を用意
ActivityレイアウトでFragmentを表示させるためには明示的にレイアウト内で設置する場所を用意する必要があります。activity_main.xmlを開いてandroidx.fragment.app.FragmentContainerViewタグを追加しておきます。
<androidx.constraintlayout.widget.ConstraintLayout xmlns:android="http://schemas.android.com/apk/res/android"
    xmlns:app="http://schemas.android.com/apk/res-auto"
    xmlns:tools="http://schemas.android.com/tools"
    android:layout_width="match_parent"
    android:layout_height="match_parent"
    tools:context=".MainActivity">

    <androidx.fragment.app.FragmentContainerView
        android:id="@+id/main_frame"
        android:name="com.example.myfragment.FirstFragment"
        android:layout_width="match_parent"
        android:layout_height="match_parent"
        app:layout_constraintBottom_toBottomOf="parent"
        app:layout_constraintEnd_toEndOf="parent"
        app:layout_constraintStart_toStartOf="parent"
        app:layout_constraintTop_toTopOf="parent" />

    <TextView
        android:layout_width="wrap_content"
        android:layout_height="wrap_content"
        android:text="MainActivity View!"
        app:layout_constraintBottom_toBottomOf="parent"
        app:layout_constraintEnd_toEndOf="parent"
        app:layout_constraintStart_toStartOf="parent"
        app:layout_constraintTop_toTopOf="parent" />

</androidx.constraintlayout.widget.ConstraintLayout>
5.android:name="com.example.プロジェクト名.FirstFragment"を付与
activity_main.xmlに上記のXMLを追加できたら最後にandroid:name="com.example.プロジェクト名.FirstFragment"をFragmentContainerViewに追加します。これは自身のFragmentクラスの参照なのでプロジェクト名が各々で変更になるので注意してください。
<androidx.fragment.app.FragmentContainerView
    android:id="@+id/main_frame"
+   android:name="com.example.myfragment.FirstFragment"
    android:layout_width="match_parent"
    android:layout_height="match_parent"
    app:layout_constraintBottom_toBottomOf="parent"
    app:layout_constraintEnd_toEndOf="parent"
    app:layout_constraintStart_toStartOf="parent"
app:layout_constraintTop_toTopOf="parent" />これでFragmentの実装が完了しました。アプリを実行して以下のように「First Fragment View」が表示されているか確認してください。またここでactivity_main.xmlにTextViewを設置したままであれば「MainActivity View」と重なって見えている状態が正解です。
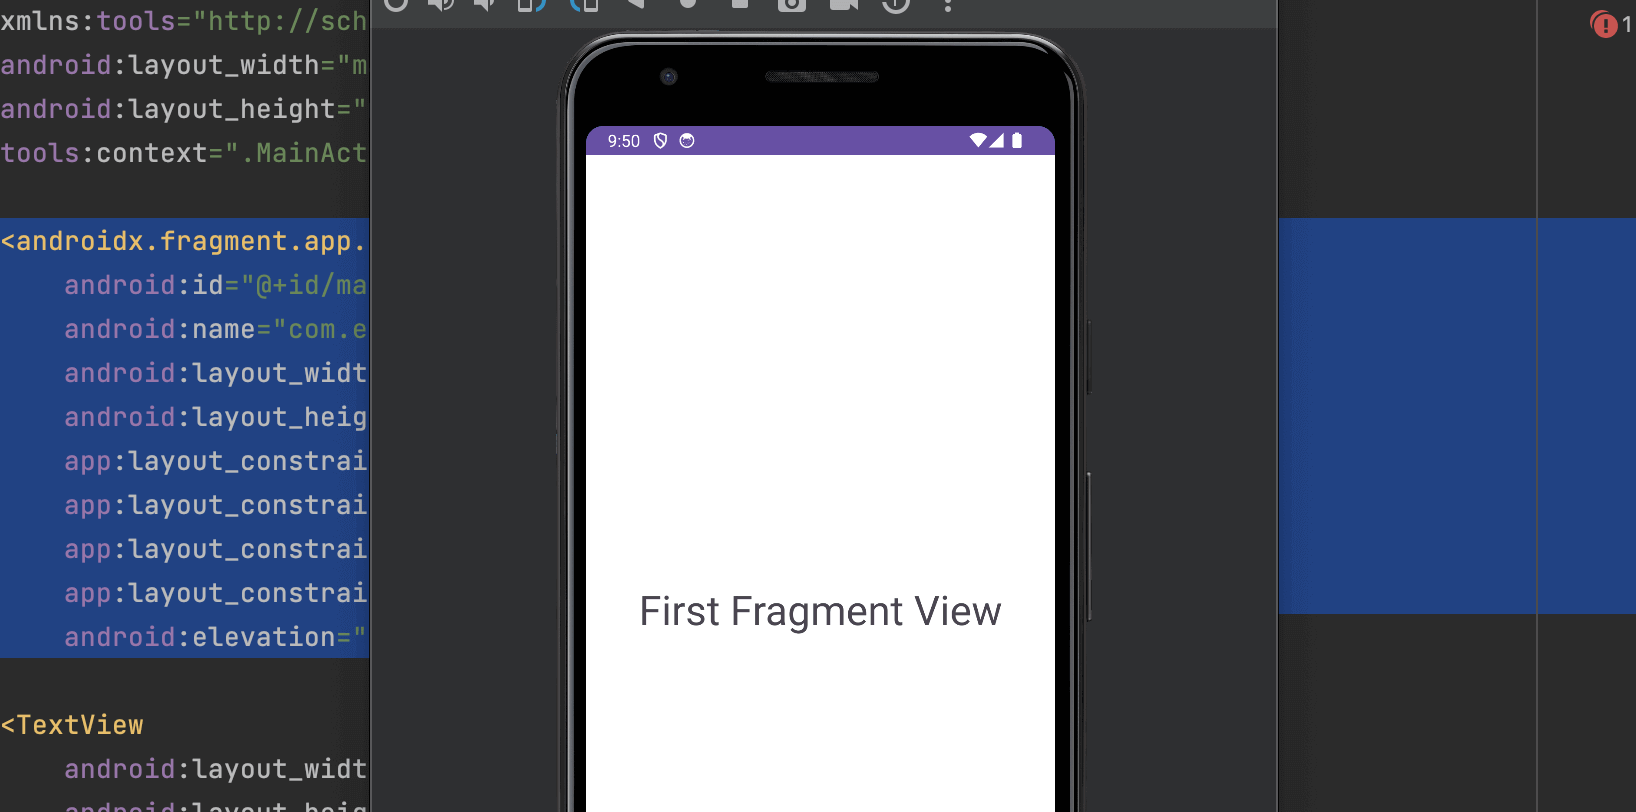
Fragmentはデフォルトでは背景色が透明でActivityの上に重なっている(activity_main.xml内の上下関係によるが)だけなので下にコンテンツがあると透けてしまいます。これを防ぐためにFragmentに背景色を追加します。
6. 背景色を追加する
背景色を追加し適応させるにはbackgroundとelevation(Z軸の階層値)の指定が必要です。追加する場所がbackgroundははelevationはactivity_main.xmlになります。
<androidx.constraintlayout.widget.ConstraintLayout xmlns:android="http://schemas.android.com/apk/res/android"
xmlns:app="http://schemas.android.com/apk/res-auto"
xmlns:tools="http://schemas.android.com/tools"
android:id="@+id/frameLayout"
android:layout_width="match_parent"
android:layout_height="match_parent"
+ android:background="@color/white"
tools:context=".FirstFragment">
<androidx.fragment.app.FragmentContainerView
android:id="@+id/main_frame"
android:name="com.example.myfragment.FirstFragment"
android:layout_width="match_parent"
android:layout_height="match_parent"
app:layout_constraintBottom_toBottomOf="parent"
app:layout_constraintEnd_toEndOf="parent"
app:layout_constraintStart_toStartOf="parent"
app:layout_constraintTop_toTopOf="parent"
+ android:elevation="10dp"/>
これでアプリ起動時にFragmentが表示されるようになりました。
ボタンのクリックでFragmentを表示させる
続いてボタンをクリックした時にFragmentが表示されるように変更していきます。
流れ
- ActivityレイアウトにButtonの追加とID付与
- android:name="com.example.myfragment.FirstFragment"の削除
- ActivityクラスからボタンのクリックイベントでFragmentを呼び出す
- Activityにクリックイベントが流れないようにする
1.ActivityレイアウトにButtonの追加とID付与
ActivityレイアウトにButtonを追加し@+id/transfer_buttonを付与しておきます。
<TextView
  // 〜〜〜〜〜〜〜〜〜〜〜〜〜〜〜〜〜〜〜〜〜〜〜〜〜〜〜〜〜〜〜〜

<Button
    android:id="@+id/transfer_button"
    android:layout_width="wrap_content"
    android:layout_height="wrap_content"
    android:text="Transfer"
    app:layout_constraintBottom_toBottomOf="@+id/main_frame"
    app:layout_constraintEnd_toEndOf="parent"
    app:layout_constraintStart_toStartOf="parent"
    app:layout_constraintTop_toBottomOf="@+id/textView2" />
2.android:name="com.example.myfragment.FirstFragment"の削除
続いて最初にFragmentが表示されないようにactivity_main.xml内のandroid:name="com.example.myfragment.FirstFragment"を削除しておきます。
<androidx.fragment.app.FragmentContainerView
android:id="@+id/main_frame"
android:layout_width="match_parent"
android:layout_height="match_parent"
app:layout_constraintBottom_toBottomOf="parent"
app:layout_constraintEnd_toEndOf="parent"
app:layout_constraintStart_toStartOf="parent"
app:layout_constraintTop_toTopOf="parent"
android:elevation="10dp"/>
3.ActivityクラスからボタンのクリックイベントでFragmentを呼び出す
最後にActivityクラスでButtonのクリックイベントにFragmentを呼び出す処理を登録していきます。
class MainActivity : AppCompatActivity() {
    override fun onCreate(savedInstanceState: Bundle?) {
        super.onCreate(savedInstanceState)
        setContentView(R.layout.activity_main)

        val button:Button = findViewById(R.id.transfer_button)

        button.setOnClickListener{
            supportFragmentManager.beginTransaction().apply {
                add(R.id.main_frame, FirstFragment())
                addToBackStack(null)
                commit()
            }
        }
    }
}
ここでのコードの役割をまとめておきます。
supportFragmentManager・・・Activity内のFragmentを管理するためのFragmentマネージャーを取得beginTransaction・・・Fragmentの追加や置換、削除などの操作をまとめて行うトランザクションの開始add(R.id.main_frame, FirstFragment())・・・Fragmentの追加addToBackStack・・・トランザクションをバックスタックに追加(戻るボタンで戻れるように)commit・・・トランザクションの変更を確定して実行
これでボタンをクリックすることでFragmentを表示させることができました。
4.Activityにクリックイベントが流れないようにする
表示させることが可能になりましたが、Fragmentの下にあるActivityのButtonが実はまだクリックできるようになってしまっています。これを防ぐにはandroid:clickable="true"を付与します。
<androidx.constraintlayout.widget.ConstraintLayout xmlns:android="http://schemas.android.com/apk/res/android"
xmlns:app="http://schemas.android.com/apk/res-auto"
xmlns:tools="http://schemas.android.com/tools"
android:id="@+id/frameLayout"
android:layout_width="match_parent"
android:layout_height="match_parent"
android:background="@color/white"
+ android:clickable="true"
tools:context=".FirstFragment">
Fragment間でデータを渡す
Fragmentに引数を渡したいときはコンストラクタで以下のように渡すことは公式から推奨されていません。それはFragmentが再生成された時に自動で引数なしコンストラクタが使用するため正常に動作しなくなる可能性があるからです。もし引数なしコンストラクタが定義されていない場合はアプリはクラッシュしてしまうようです。そのためここから紹介するBundleを用いた方法が推奨されています。
class FirstFragment(private val text: text)ではActivityからFragmentに遷移した時やFragment間を遷移した際にデータを渡す実装をみていきます。
流れ
- Fragmentクラスに引数用のプロパティ/Bundle用のキーを定義を追加
- インスタンスするためのメソッドを用意しBundleへ格納
- onCreate/onViewCreatedメソッドの記述
- Activity側でnewInstanceメソッドを呼び出す
1.Fragmentクラスに引数用のプロパティ/Bundle用のキーを定義を追加
まずはFragmentクラスにデータを渡された時に受け取るためのプロパティを追加します。またデータの受け渡しにはBundleクラス(後述)を使用するためキー値用のARG_KEYも定義しておきます。
private const val ARG_KEY = "key"
class FirstFragment : Fragment() {
private var text:String = ""
〜〜〜〜〜〜〜〜〜〜〜〜〜〜〜
}
2.インスタンスするためのメソッドを用意しBundleへ格納
続いてFragmentクラスをインスタンス化時に引数からデータを受け取るためのインスタンス化メソッドを記述します。newInstanceメソッドを定義し以下のように記述します。
companion object{
@JvmStatic
fun newInstance(text:String) =
FirstFragment().apply {
arguments = Bundle().apply {
putString(ARG_KEY,text)
}
}
}
@JvmStaticはJava環境でも動作できるようにするためのアノテーションです。putStringでBundleの中に格納しています。※Bundleとはデータを一時的に保持するための格納場所です。
3.onCreate/onViewCreatedメソッドの記述
FragmentのライフサイクルであるonCreateとonViewCreatedメソッドをオーバーライドし以下のように記述します。
override fun onCreate(savedInstanceState: Bundle?) {
super.onCreate(savedInstanceState)
arguments?.let {
text = it.getString(ARG_KEY,"初期値")
}
}
override fun onViewCreated(view: View, savedInstanceState: Bundle?) {
super.onViewCreated(view, savedInstanceState)
val textView:TextView = view.findViewById(R.id.frag_text)
textView.setText(text)
}
onCreateメソッドで生成された時にBundleからデータを取り出してプロパティに格納し、onViewCreatedメソッド内で実際にデータをTextViewに格納しています。
4.Activity側でnewInstanceメソッドを呼び出す
最後にActivity側のadd部分を変更してnewInstanceメソッドを呼び出して完了です。ここでActivity側から渡したい値を引数に入れます。今回は文字列をそのまま入力しましたが、EditTextなどで入力された文字などを渡すことも可能になります。
 supportFragmentManager.beginTransaction().apply {
    add(R.id.main_frame, FirstFragment.newInstance("Activityからもらったよ"))
    addToBackStack(null)
    commit()
}
複数のFragmentを画面遷移する
Fragmentを複数用意して画面遷移していく方法をまとめていきます。
流れ
- SecondFragmentの作成
- FirstFragmentに遷移用のボタンを追加
- FirstFragmentクラスからボタンのクリックイベントでSecondFragmentを呼び出す
- SecondFragmentクラスからボタンのクリックイベントでルートビューへ戻る
また他にも画面遷移する方法としてNavigation Componentがあります。
1.SecondFragmentの作成
まずは最初にFragmentを作成した要領でSecondFragmentを作成します。クラスの中身も同様にスッキリさせておき、レイアウトの中にはTextViewとButtonを追加しておいてください。
ここで設置するButtonにはid:back_buttonを付与しておきます。idの通りこのボタンを押した際にルートビュー(アクティビティー)まで戻るようにしていきます。
<?xml version="1.0" encoding="utf-8"?>
<androidx.constraintlayout.widget.ConstraintLayout xmlns:android="http://schemas.android.com/apk/res/android"
    xmlns:app="http://schemas.android.com/apk/res-auto"
    xmlns:tools="http://schemas.android.com/tools"
    android:id="@+id/frameLayout2"
    android:layout_width="match_parent"
    android:layout_height="match_parent"
    android:background="@color/white"
    tools:context=".SecondFragment">

    <!-- TODO: Update blank fragment layout -->

    <TextView
        android:id="@+id/textView"
        android:layout_width="wrap_content"
        android:layout_height="wrap_content"
        android:text="Second Fragment View"
        android:textSize="24sp"
        app:layout_constraintBottom_toBottomOf="parent"
        app:layout_constraintEnd_toEndOf="parent"
        app:layout_constraintStart_toStartOf="parent"
        app:layout_constraintTop_toTopOf="parent" />

    <Button
        android:id="@+id/back_button"
        android:layout_width="wrap_content"
        android:layout_height="wrap_content"
        android:text="戻る"
        app:layout_constraintBottom_toBottomOf="parent"
        app:layout_constraintEnd_toEndOf="parent"
        app:layout_constraintStart_toStartOf="parent"
        app:layout_constraintTop_toBottomOf="@+id/textView" />

</androidx.constraintlayout.widget.ConstraintLayout>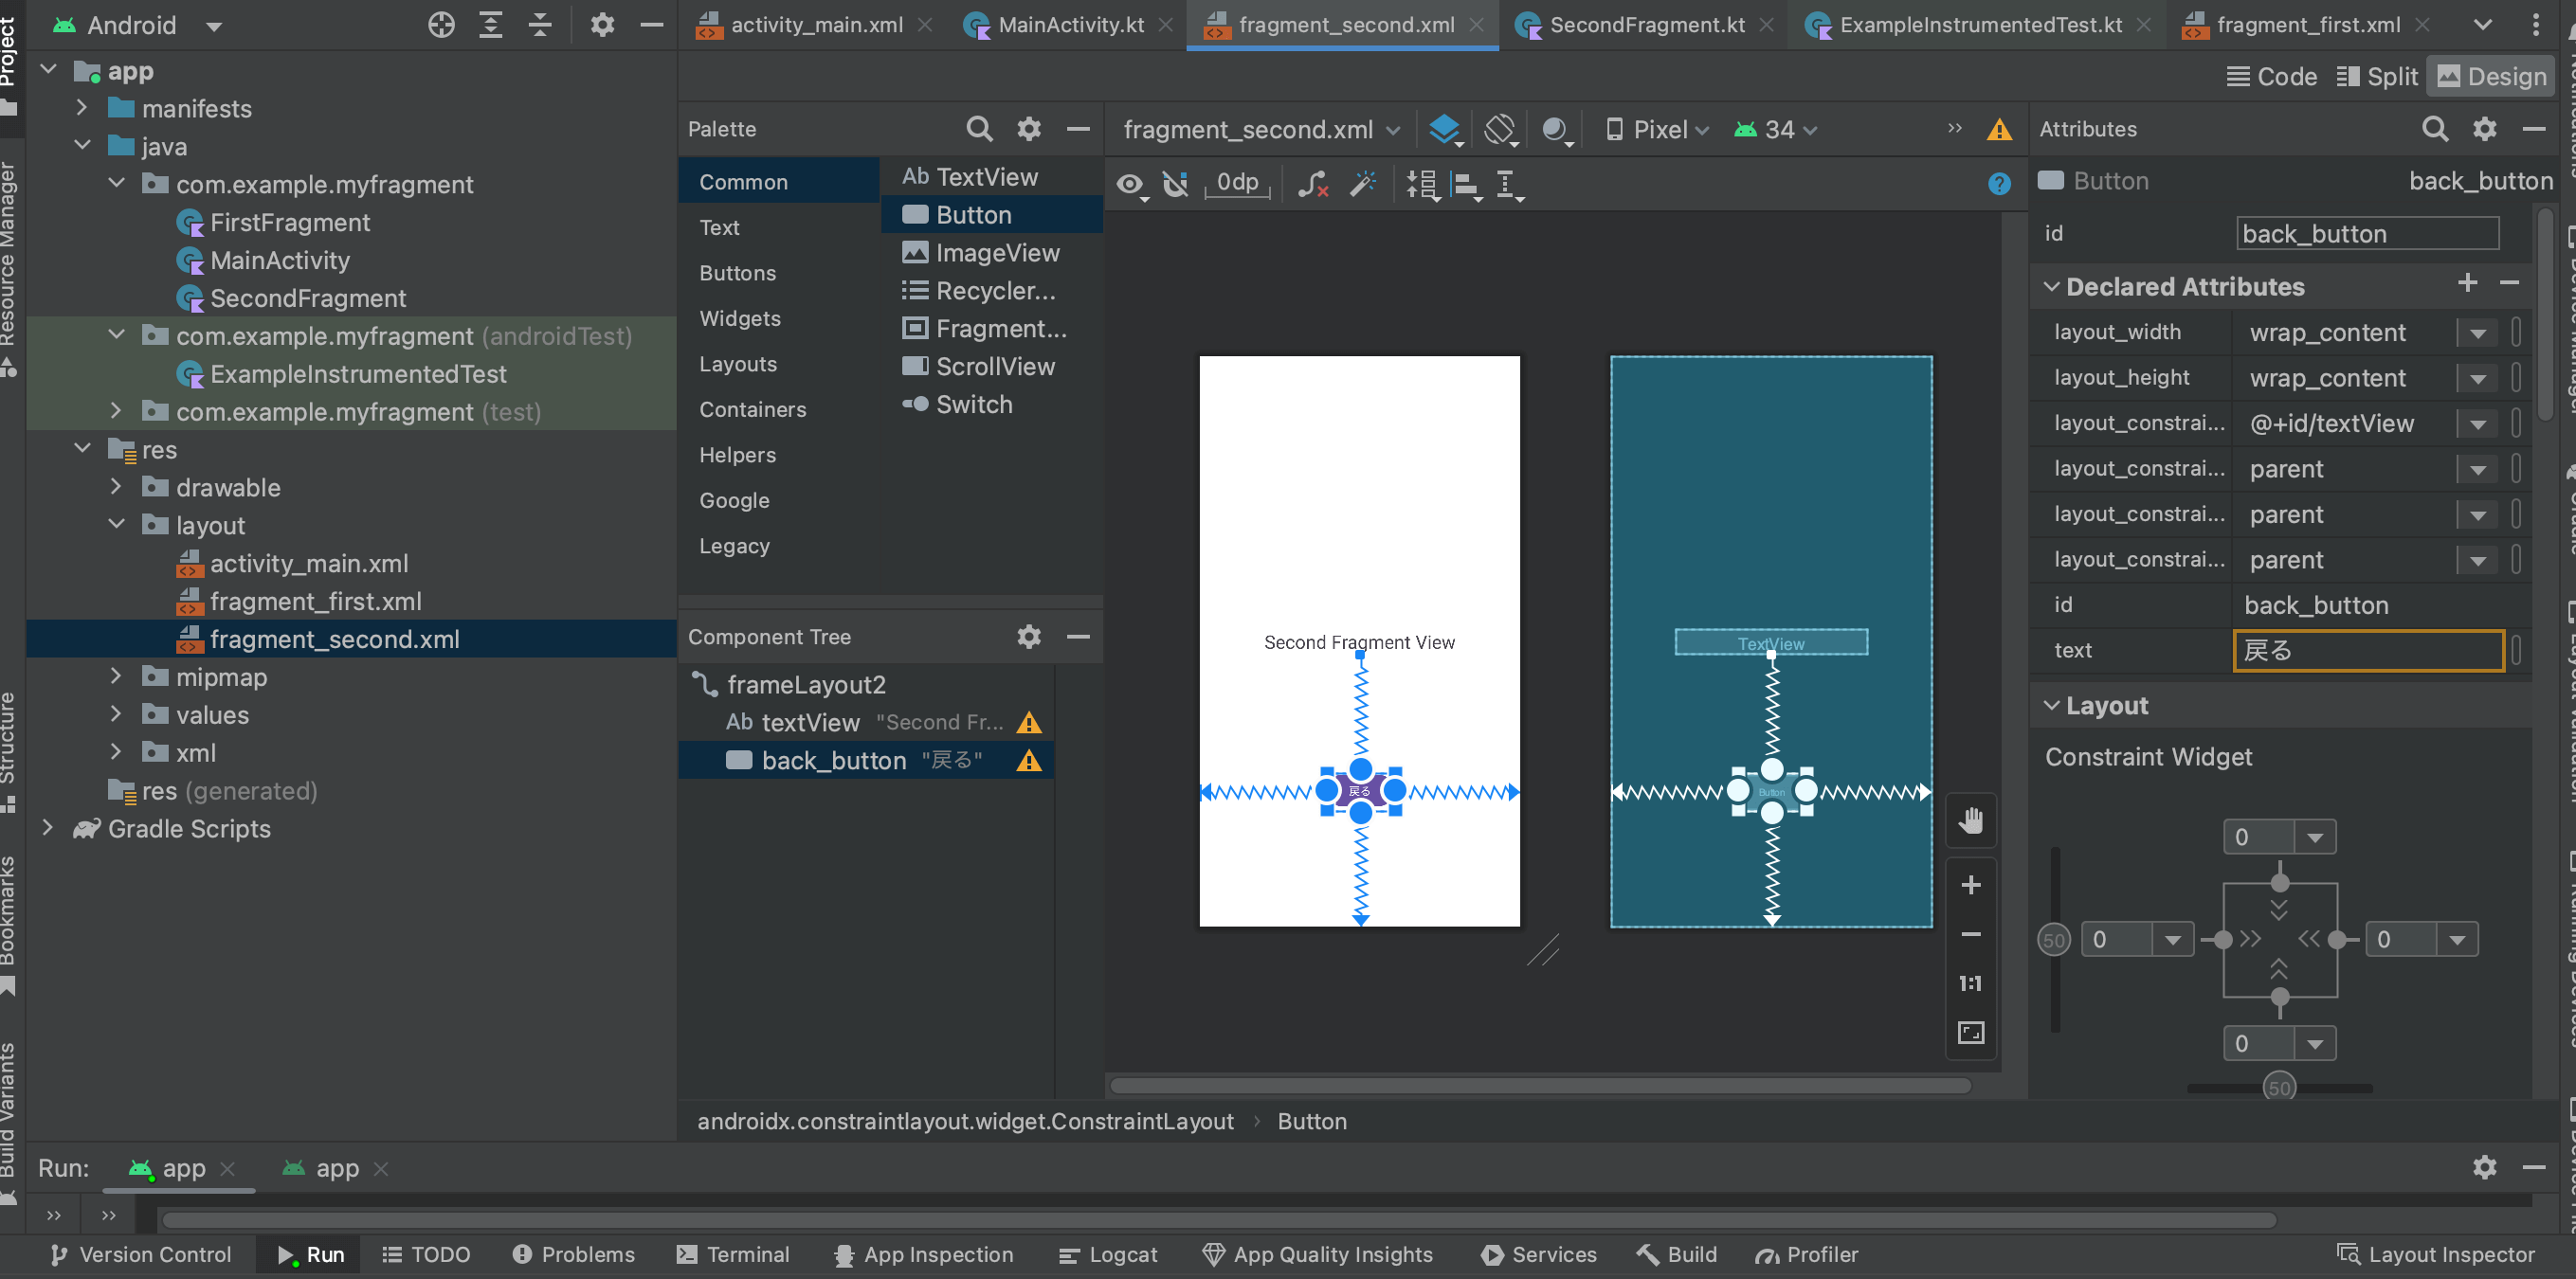
2.FirstFragmentに遷移用のボタンを追加
FirstFragmentレイアウトの中にButtonを追加します。このボタンをクリックした際にSecondFragmentへ遷移するようにします。id:second_to_buttonを付与しておいてください。
<Button
  android:id="@+id/second_to_button"
  android:layout_width="wrap_content"
  android:layout_height="wrap_content"
  android:text="SecondFragmentへ"
  app:layout_constraintBottom_toBottomOf="parent"
  app:layout_constraintEnd_toEndOf="parent"
  app:layout_constraintStart_toStartOf="parent"
  app:layout_constraintTop_toBottomOf="@+id/frag_text" />
3.FirstFragmentクラスからボタンのクリックイベントでSecondFragmentを呼び出す
FirstFragmentクラスからボタンのクリックイベントでSecondFragmentを呼び出す処理を記述していきます。最初と異なるのはaddではなくreplaceメソッドになっている点です。
override fun onViewCreated(view: View, savedInstanceState: Bundle?) {
super.onViewCreated(view, savedInstanceState)
val textView:TextView = view.findViewById(R.id.frag_text)
textView.setText(text)
var button:Button = view.findViewById(R.id.second_to_button)
button.setOnClickListener{
parentFragmentManager.beginTransaction().apply {
replace(R.id.main_frame, SecondFragment())
addToBackStack(null)
commit()
}
}
}
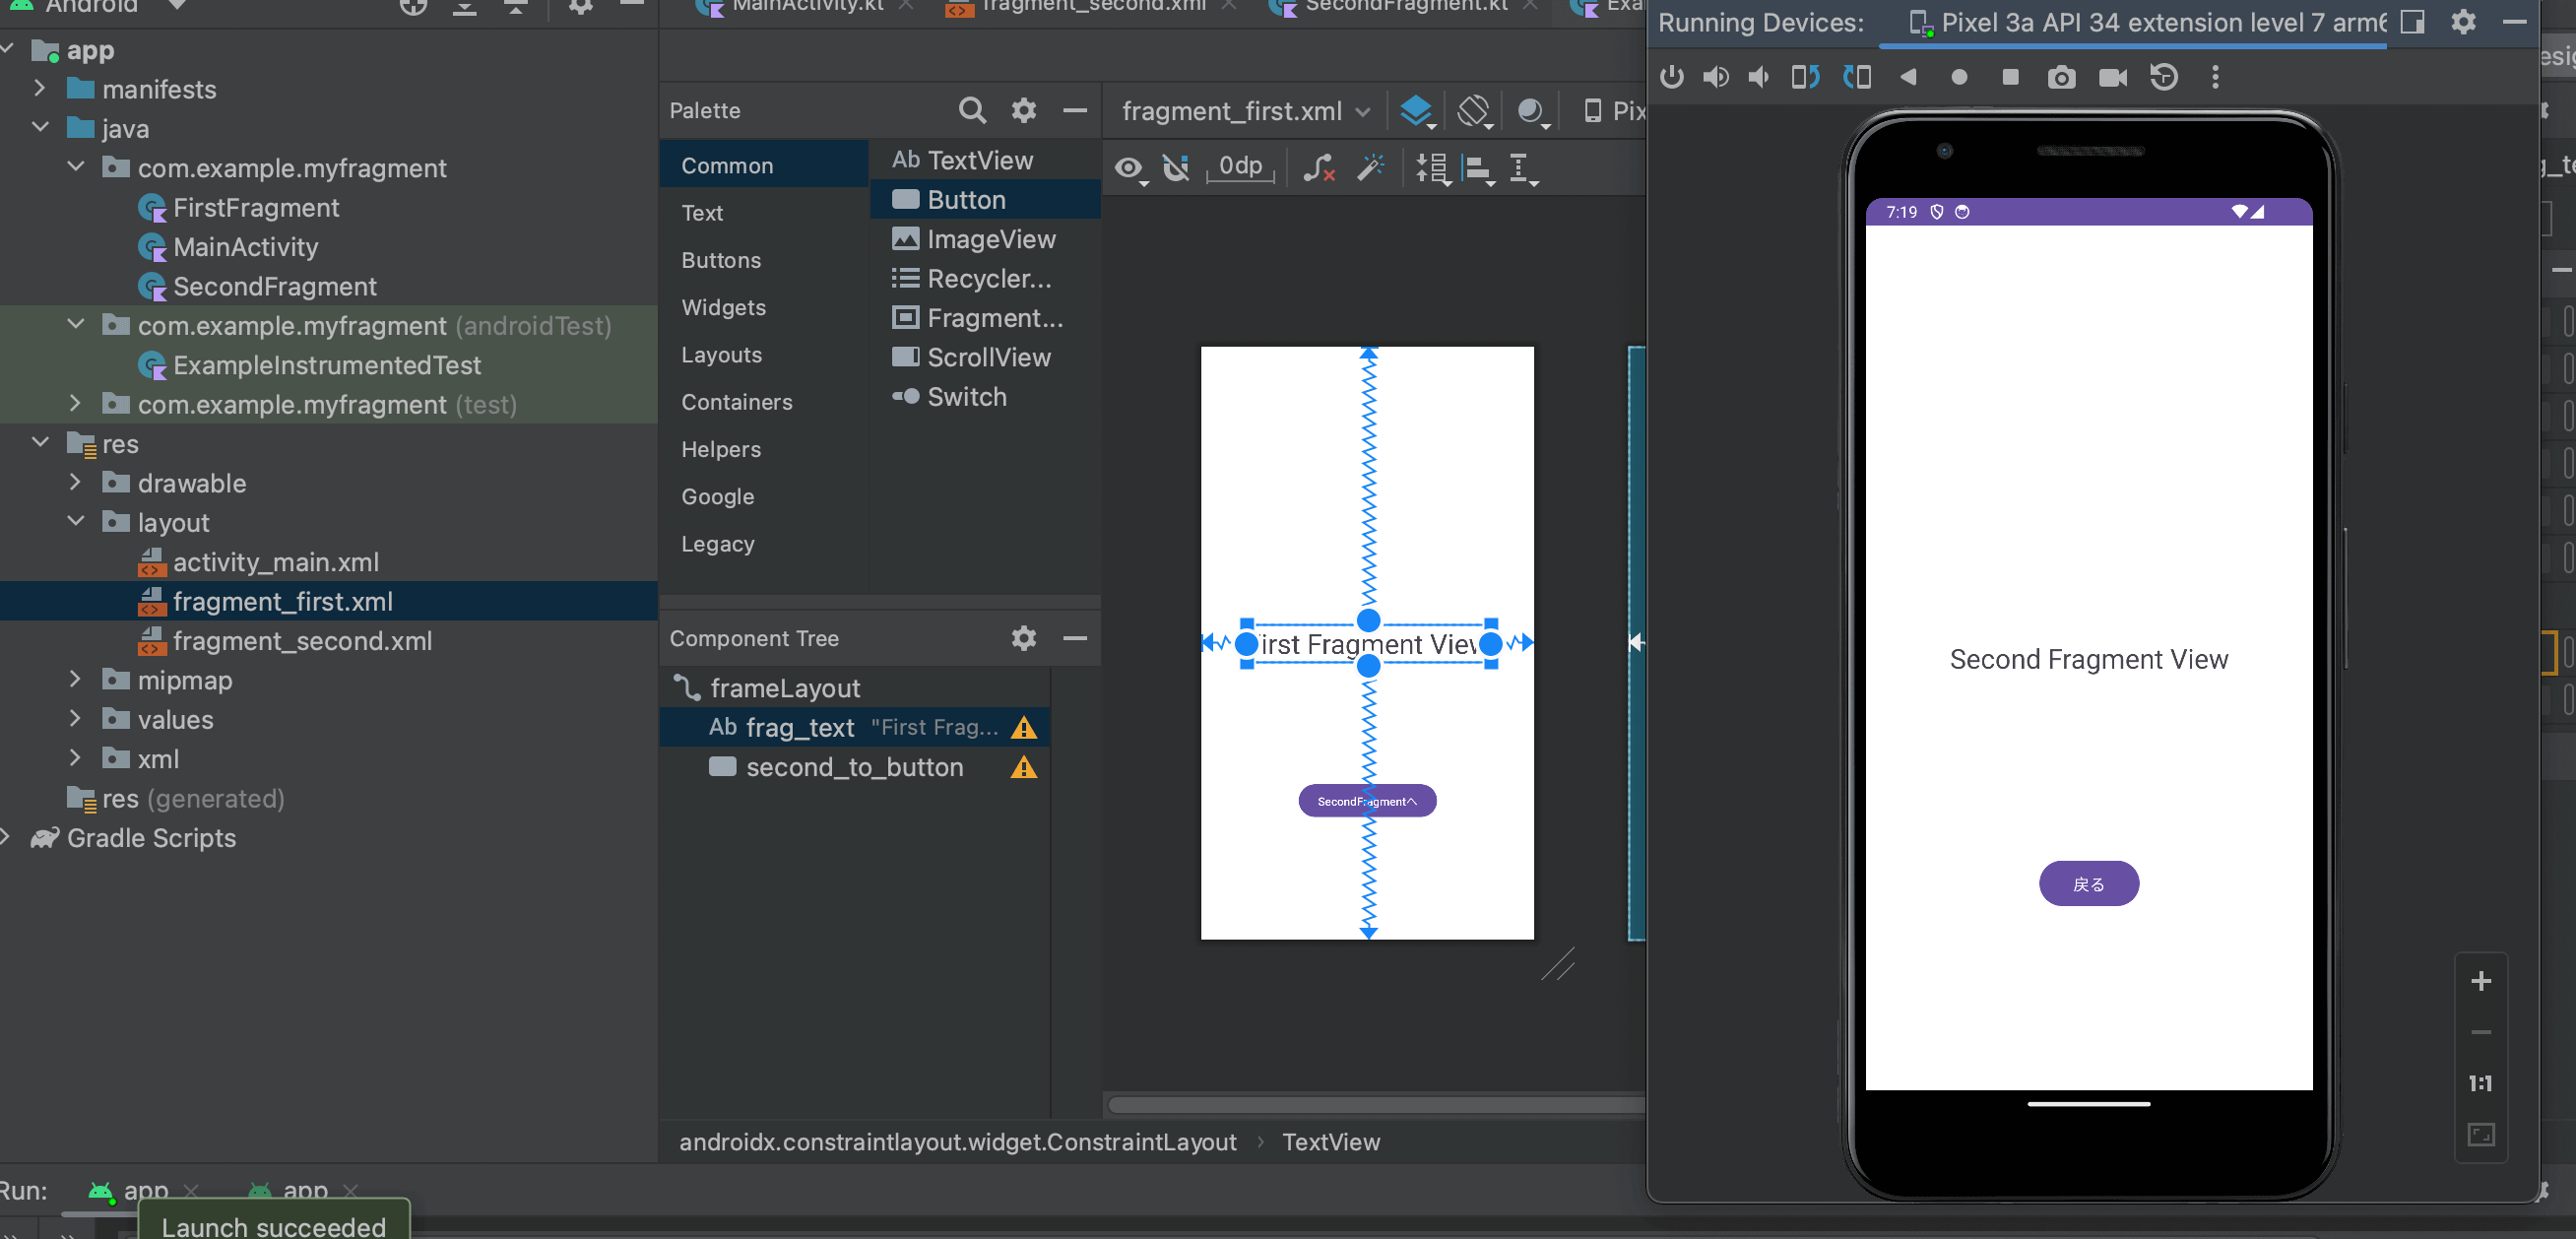
4.SecondFragmentクラスからボタンのクリックイベントでルートビューへ戻る
最後にSecondFragmentクラスからボタンのクリックイベントでルートビューへ戻すための処理を記述していきます。現在の画面から1つ戻るpopBackStackメソッドを2回呼び出すことでルートビューまで画面を遷移させています。
override fun onViewCreated(view: View, savedInstanceState: Bundle?) {
super.onViewCreated(view, savedInstanceState)
val backButton:Button = view.findViewById(R.id.back_button)
backButton.setOnClickListener{
parentFragmentManager.apply {
popBackStack()
popBackStack()
}
}
}
まだまだ勉強中ですので間違っている点や至らぬ点がありましたら教えていただけると助かります。
ご覧いただきありがとうございました。