【Kotlin/Android Studio】DataBindingの方法!findViewByIdを排除する

この記事からわかること
- Android StudioのDataBinding(データバインディング)を利用する方法
- findViewByIdを使用せずにViewを取得する
- データクラスをバインディングするには?
index
[open]
\ アプリをリリースしました /


参考文献:公式リファレンス:3. タスク: データ バインディングを使用して findViewById() を排除する
参考文献:公式リファレンス:DataBindingライブラリ
環境
- Android Studio:Flamingo
- Kotlin:1.8.20
DataBinding(データバインディング)とは?
Androidアプリ開発のDataBinding(データバインディング)とは宣言的にレイアウト内のUIコンポーネントをアプリのデータソースにバインドできるライブラリです。
例えばレイアウト内のTextViewなどのウィジェットを取得したい場合にはfindViewByIdメソッドを使用しますが、これを使用せずとも取得することが可能になったりします。
今回のプロジェクトの全体はGitHubに上げていますので参考にしてください。
1.Fragmentクラス/レイアウトの生成
導入方法
導入は簡単で「build.gradle(Module)」内のandroidの中に以下の文を追記して「Sync Now」を押すだけです。
android {
// 〜〜〜〜〜〜
buildFeatures {
dataBinding true
}
// 〜〜〜〜〜〜
}
これで導入が完了しました。
レイアウトファイルを変更する
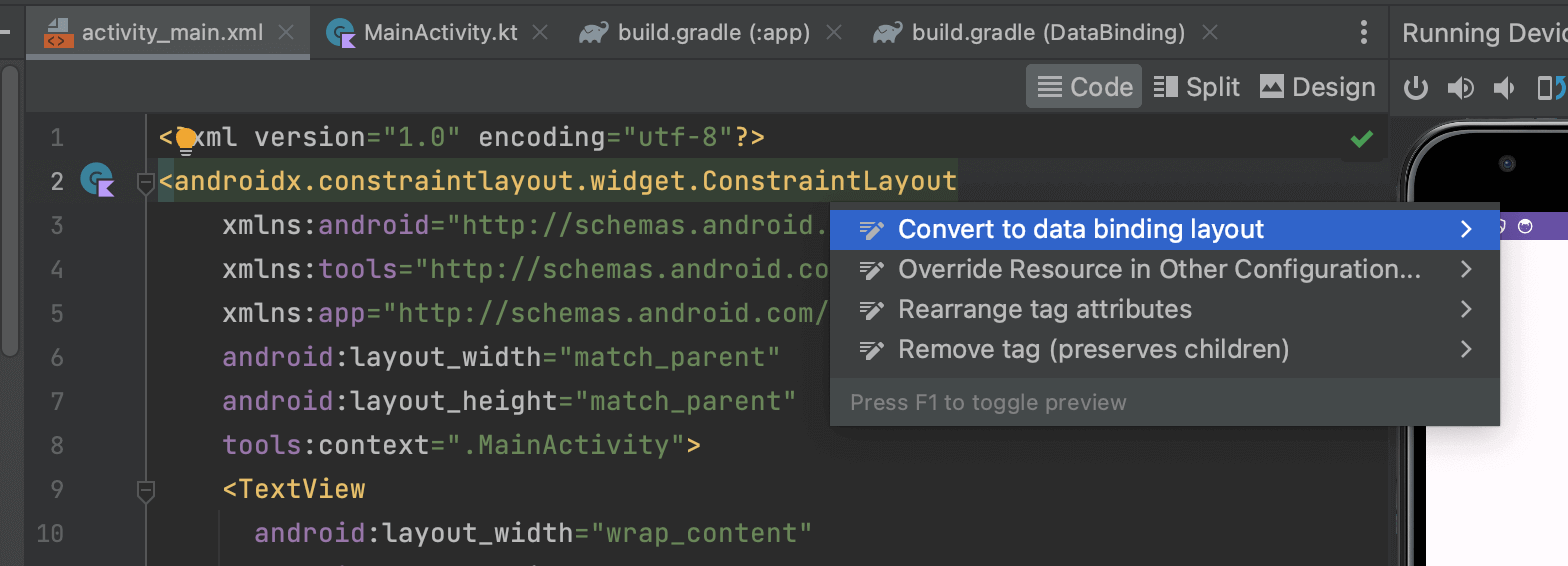
DataBindingを使用したい場合はXMLレイアウトファイルのルートを<layout>タグで囲む必要があります。対象のXMLファイルをコードで開いて現在のルートタグ部分で「Option + Enter」を押し「Convert to data binding layout」をクリックします。すると中身が自動的に変換されます。
<?xml version="1.0" encoding="utf-8"?>
<layout xmlns:android="http://schemas.android.com/apk/res/android"
xmlns:tools="http://schemas.android.com/tools"
xmlns:app="http://schemas.android.com/apk/res-auto">
<data>
</data>
<androidx.constraintlayout.widget.ConstraintLayout
android:layout_width="match_parent"
android:layout_height="match_parent"
tools:context=".MainActivity">
<TextView
android:id="@+id/main_text"
android:layout_width="wrap_content"
android:layout_height="wrap_content"
android:text="Hello World!"
app:layout_constraintBottom_toBottomOf="parent"
app:layout_constraintStart_toStartOf="parent"
app:layout_constraintEnd_toEndOf="parent"
app:layout_constraintTop_toTopOf="parent" />
<Button
android:id="@+id/done_button"
android:layout_width="wrap_content"
android:layout_height="wrap_content"
android:text="Button"
app:layout_constraintBottom_toBottomOf="parent"
app:layout_constraintEnd_toEndOf="parent"
app:layout_constraintStart_toStartOf="parent"
app:layout_constraintTop_toBottomOf="@+id/main_text" />
</androidx.constraintlayout.widget.ConstraintLayout>
</layout>
ルートに<layout>タグが追加され、名前空間が<layout>タグに移動しています。また<data>タグも自動で付与されています。
レイアウトリソースを参照する
まずはActivityからレイアウト内のウィジェットを参照してみます。MainActivityクラス内にbindingプロパティを追加します。データ型はActivityMainBinding(クラス名の逆 + Binding)になります。例えばInputFragmentクラスならFragmentInputBindingになります。
private lateinit var binding: ActivityMainBinding
次にonCreateメソッド内のsetContentViewメソッドを以下のように置き換えます。
binding = DataBindingUtil.setContentView(this, R.layout.activity_main)
これで準備が整いました。bindingプロパティからウィジェットに付与したidのキャメルケースで該当のViewを取得できるようになります。done_button→doneButton
binding.doneButton.setOnClickListener{
binding.mainText.setText("こんにちは")
}
データクラスをBindingする
データクラスを用意します。
data class User(
var name: String = "",
var nickname: String = ""
)
続いて<data>タグの中に<variable>タグを追加し、name属性とtype属性を以下のように記述します。タイプは各々のプロジェクト名に変換してください。
<data>
<variable name="user" type="com.example.databinding.User" />
</data>
今回はデータクラスをTextViewのtextにbindingしてみます。android:textを@={user.name}のように@={データクラス名.プロパティ}形式でセットします。
<TextView
android:id="@+id/main_text"
android:layout_width="wrap_content"
android:layout_height="wrap_content"
+ android:text="@={user.name}"
app:layout_constraintBottom_toBottomOf="parent"
app:layout_constraintStart_toStartOf="parent"
app:layout_constraintEnd_toEndOf="parent"
app:layout_constraintTop_toTopOf="parent" />
これでTextViewのtextがUserクラスと紐づいているので「MainActivity」内から以下のようにbinding.クラス名で参照し、そこにデータを格納することでTextViewにも反映されるようになります。
binding.user = User("ame")
動的に変化させる
EditTextから変更された値をボタンクリック時にTextViewに反映させてみたいと思います。EditTextとtextViewを追加しておきます。
<EditText
android:id="@+id/edit_nickname"
android:layout_width="wrap_content"
android:layout_height="wrap_content"
android:ems="10"
android:inputType="text"
android:text="nickname"
app:layout_constraintBottom_toTopOf="@+id/main_text"
app:layout_constraintEnd_toEndOf="parent"
app:layout_constraintStart_toStartOf="parent"
app:layout_constraintTop_toTopOf="parent" />
<TextView
android:id="@+id/textView"
android:layout_width="wrap_content"
android:layout_height="wrap_content"
android:text="@={user.nickname}"
app:layout_constraintBottom_toTopOf="@+id/main_text"
app:layout_constraintEnd_toEndOf="parent"
app:layout_constraintStart_toStartOf="parent"
app:layout_constraintTop_toBottomOf="@+id/edit_nickname" />
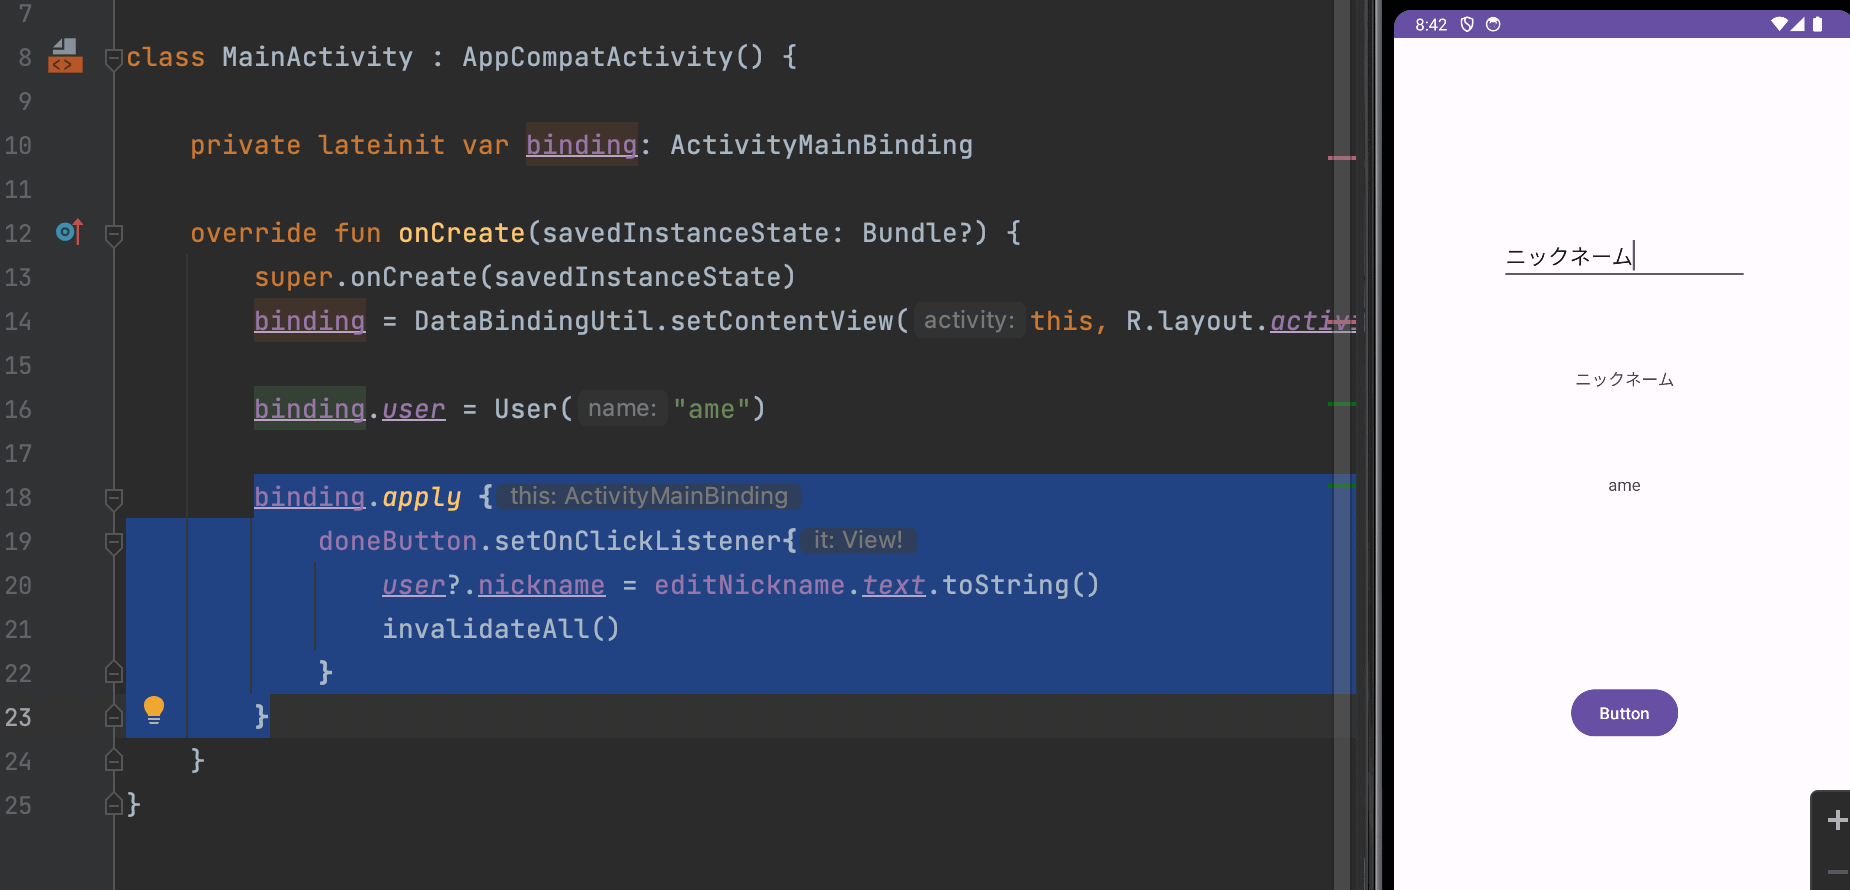
コードは以下の通りになります。applyを使って重複するbindingを省略しています。動的に更新されたデータを反映させるにはinvalidateAllメソッドを最後に実行します。
binding.apply {
doneButton.setOnClickListener{
user?.nickname = editNickname.text.toString()
invalidateAll()
}
}
まだまだ勉強中ですので間違っている点や至らぬ点がありましたら教えていただけると助かります。
ご覧いただきありがとうございました。