【Swift UIKit】UITableViewCellのaccessoryType/accessoryViewで右側にビューを表示する

この記事からわかること
- SwiftのUIKitでUITableViewCellの右側にアイコンなどを表示する方法
- accessoryType/accessoryViewプロパティの使い方
- AccessoryTypeで指定できる値とは?
- 画像やラベル、TextFieldを指定する方法
index
[open]
\ アプリをリリースしました /


SwiftのUIKitでUITableViewを使ったセルの中に右側にアイコンやビューを配置する方法をまとめていきます。UITableViewの基本的な使用方法はこの記事では解説しませんので、以下の記事を参考にしてください。
UITableViewでセル右側にアイコンを配置
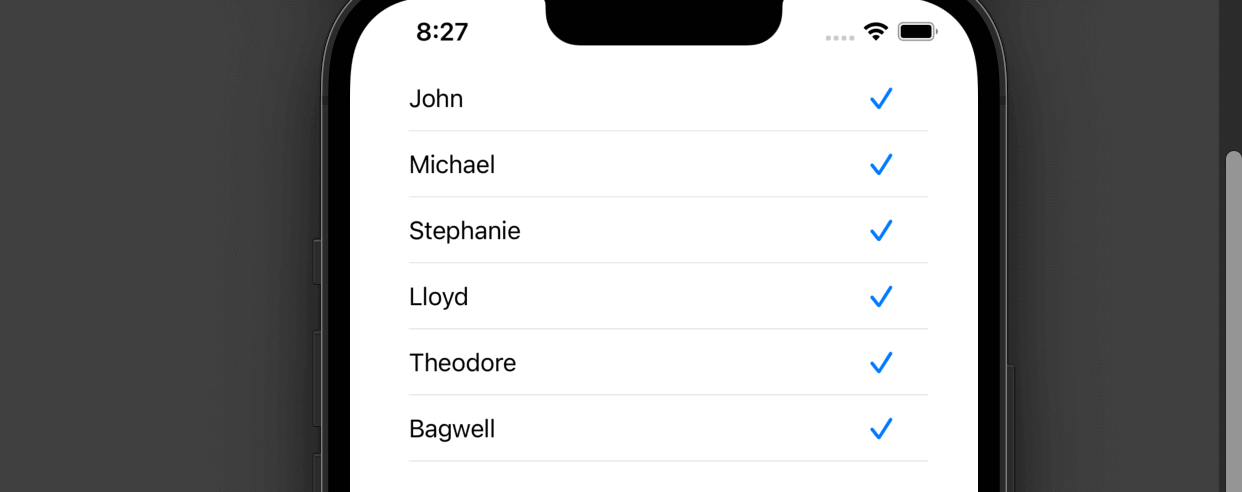
UITableViewで表示しているリストの1行1行(セルと呼ぶ)の右側に以下のようにビューを設置する方法を探していたのですが、カスタムセルを作成するしかないかなと思っていましたがまさしくのプロパティが2つ用意されていました。
おすすめ記事:【Swift UIKit】UITableViewCellでカスタムセルビューの作り方!
- accessoryType:デフォルトのアイコンから配置
- accessoryView:カスタムで作成して配置
これらのプロパティを使うことで以下のようなビューを簡単に実装することができました。
accessoryType
UITableViewCellクラスのもつaccessoryTypeプロパティはセルの右側にアクセサリーを追加できるプロパティです。セルを構築するためのtableView(_ tableView: UITableView, cellForRowAt indexPath: IndexPath)メソッドの中でこのプロパティに値をセットすればアイコン表示されるようになります。
import UIKit

class ViewController: UIViewController, UITableViewDataSource, UITableViewDelegate {

    let userData = ["John","Michael","Stephanie","Lloyd","Theodore","Bagwell"]

    override func viewDidLoad() {
        super.viewDidLoad()
        // Do any additional setup after loading the view, typically from a nib.
    }

    // セルの数
    func tableView(_ tableView: UITableView, numberOfRowsInSection section: Int) -> Int {
        return self.userData.count;
    }

    // セルの生成
    func tableView(_ tableView: UITableView, cellForRowAt indexPath: IndexPath) -> UITableViewCell {
        let cell = UITableViewCell(style: .default, reuseIdentifier: "myCell")
        cell.textLabel?.text = self.userData[indexPath.row]
        cell.accessoryType = .checkmark
        return cell
    }
}追加できるアクセサリーは列挙型AccessoryTypeに定義されている値になります。
AccessoryType
AccessoryTypeとして用意されているのは以下の5種類です。画面遷移の際に使用できる「>」マークや汎用性の高いチェックマークが既に定義されています。
enum AccessoryType : Int, @unchecked  Sendable{
    case none  // デフォルト値 非表示
    case disclosureIndicator // 「>」マーク
    case detailDisclosureButton // 情報ボタンと「>」マーク
    case checkmark  // チェックマーク
    case detailButton // 情報ボタン
}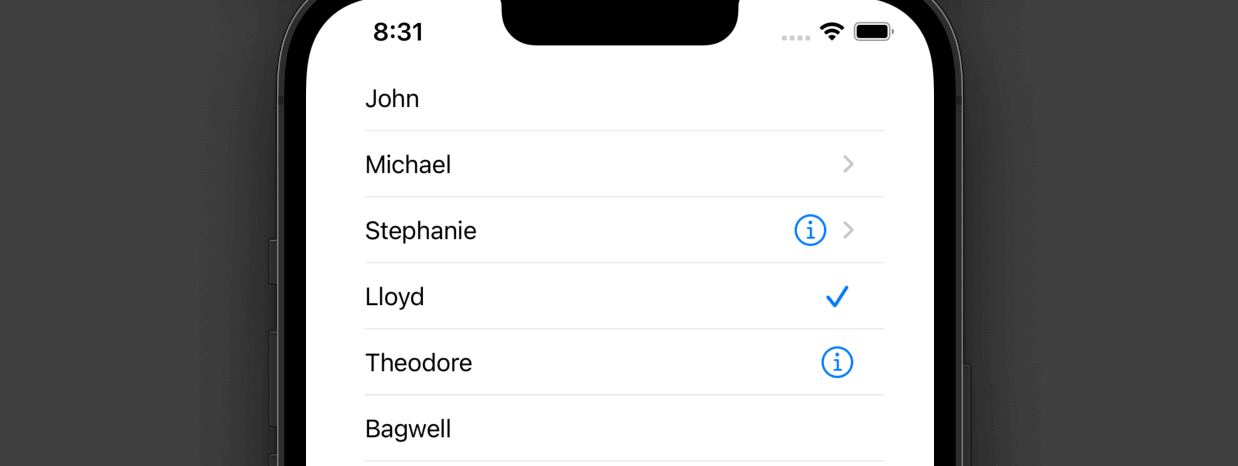
セルによって表示させるアイコンを変更するにはindexPath.row(行番号)で識別して分岐させればOKです。
func tableView(_ tableView: UITableView, cellForRowAt indexPath: IndexPath) -> UITableViewCell {
  let cell = UITableViewCell(style: .default, reuseIdentifier: "myCell")
  cell.textLabel?.text = self.userData[indexPath.row]
  if indexPath.row == 1{
      cell.accessoryType = .disclosureIndicator
  }else if indexPath.row == 2{
      cell.accessoryType = .detailDisclosureButton
  }else if indexPath.row == 3{
      cell.accessoryType = .checkmark
  }else if indexPath.row == 4{
      cell.accessoryType = .detailButton
  }else if indexPath.row == 5{
      cell.accessoryType = .none
  }
  return cell
}
accessoryView
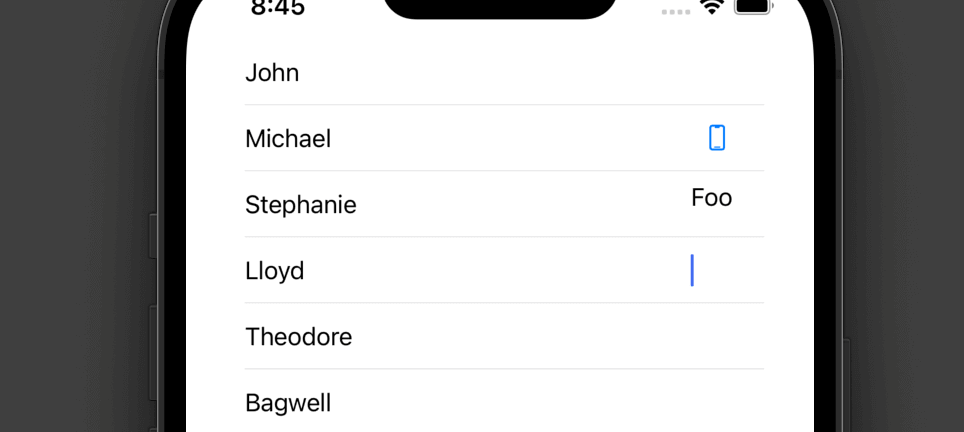
UITableViewCellクラスのもつaccessoryViewプロパティはセルの右側に自由にアクセサリービューを追加できるプロパティです。UIView型であれば表示できるのでとても便利なプロパティです。
 func tableView(_ tableView: UITableView, cellForRowAt indexPath: IndexPath) -> UITableViewCell {
    let cell = UITableViewCell(style: .default, reuseIdentifier: "myCell")
    cell.textLabel?.text = self.userData[indexPath.row]

    if indexPath.row == 1{
          let image = UIImage(systemName: "iphone")
          cell.accessoryView = UIImageView(image: image)
      }else if indexPath.row == 2{
          let label = UILabel(frame: CGRect(x: 10, y: 10, width: 30, height: 30))
          label.text = "Foo"
          cell.accessoryView = label
      }else if indexPath.row == 3{
          let field = UITextField(frame: CGRect(x: 10, y: 10, width: 30, height: 30))
          cell.accessoryView = field
      }
    return cell
}
まだまだ勉強中ですので間違っている点や至らぬ点がありましたら教えていただけると助かります。
ご覧いただきありがとうございました。