【Swift】NotificationCenterクラスの使い方!NSNotification.Name型の種類!
この記事からわかること
- SwiftのNotificationCenterクラスの使い方
- Observerパターン(Publish-Subscribeパターン)とは?
- 通知(イベント)を検知して処理を発火させる方法
- addObserverメソッドやpostメソッドの役割
- NSNotification.Name型
index
[open]
\ アプリをリリースしました /


アプリを開発時にNotificationCenterクラスが活用できそうな場面に出会ったのですがいまいち理解できていなかったため、NotificationCenterクラスを操作する上での基本的なAPIやアプリ設計への導入方法、役割などを備忘録がてらまとめておきます。
NotificationCenterクラスとは?
そもそもSwiftのNotificationCenterクラスとは異なるクラス間でイベントを通知するための機能を実装できるクラスです。これはGoFのデザインパターンの1つ「Observerパターン」に倣った仕組みとなっています。
Observerパターンとはオブジェクトの状態を観測し、変化した状態によって別のオブジェクトの状態を更新するデザインパターンです。さらにObserverパターンの派生のような「Publish-Subscribeパターン」がNotificationCenterにはピッタリ合致します。Publish-Subscribeパターンは「Publish」と「Subscribe」の2つのオブジェクトと中間に「Broker(仲介人)」(メッセージブローカー/イベントブローカー)と呼ばれるイベント通知を管理する役割を持った存在を設けて設計されます。

この設計は頭の片隅においておくとNotificationCenterについて理解しやすいかと思います。
Observerパターン/Publish-Subscribeパターン
- Observerパターンは「観察される側(Subject)」と「観測する側(Observer)」に分かれる
- Publish-SubscribeパターンはSubject/ObserverではなくPublish/Subscribeに変わる(役割は似てる)
- Publish-Subscribeパターンは「Broker(仲介人)」を介す
- Publish:イベント通知の出版
- Subscribe:イベント通知の購読
NotificationCenterの使用目的と役割
公式リファレンス:NotificationCenterクラス
役割
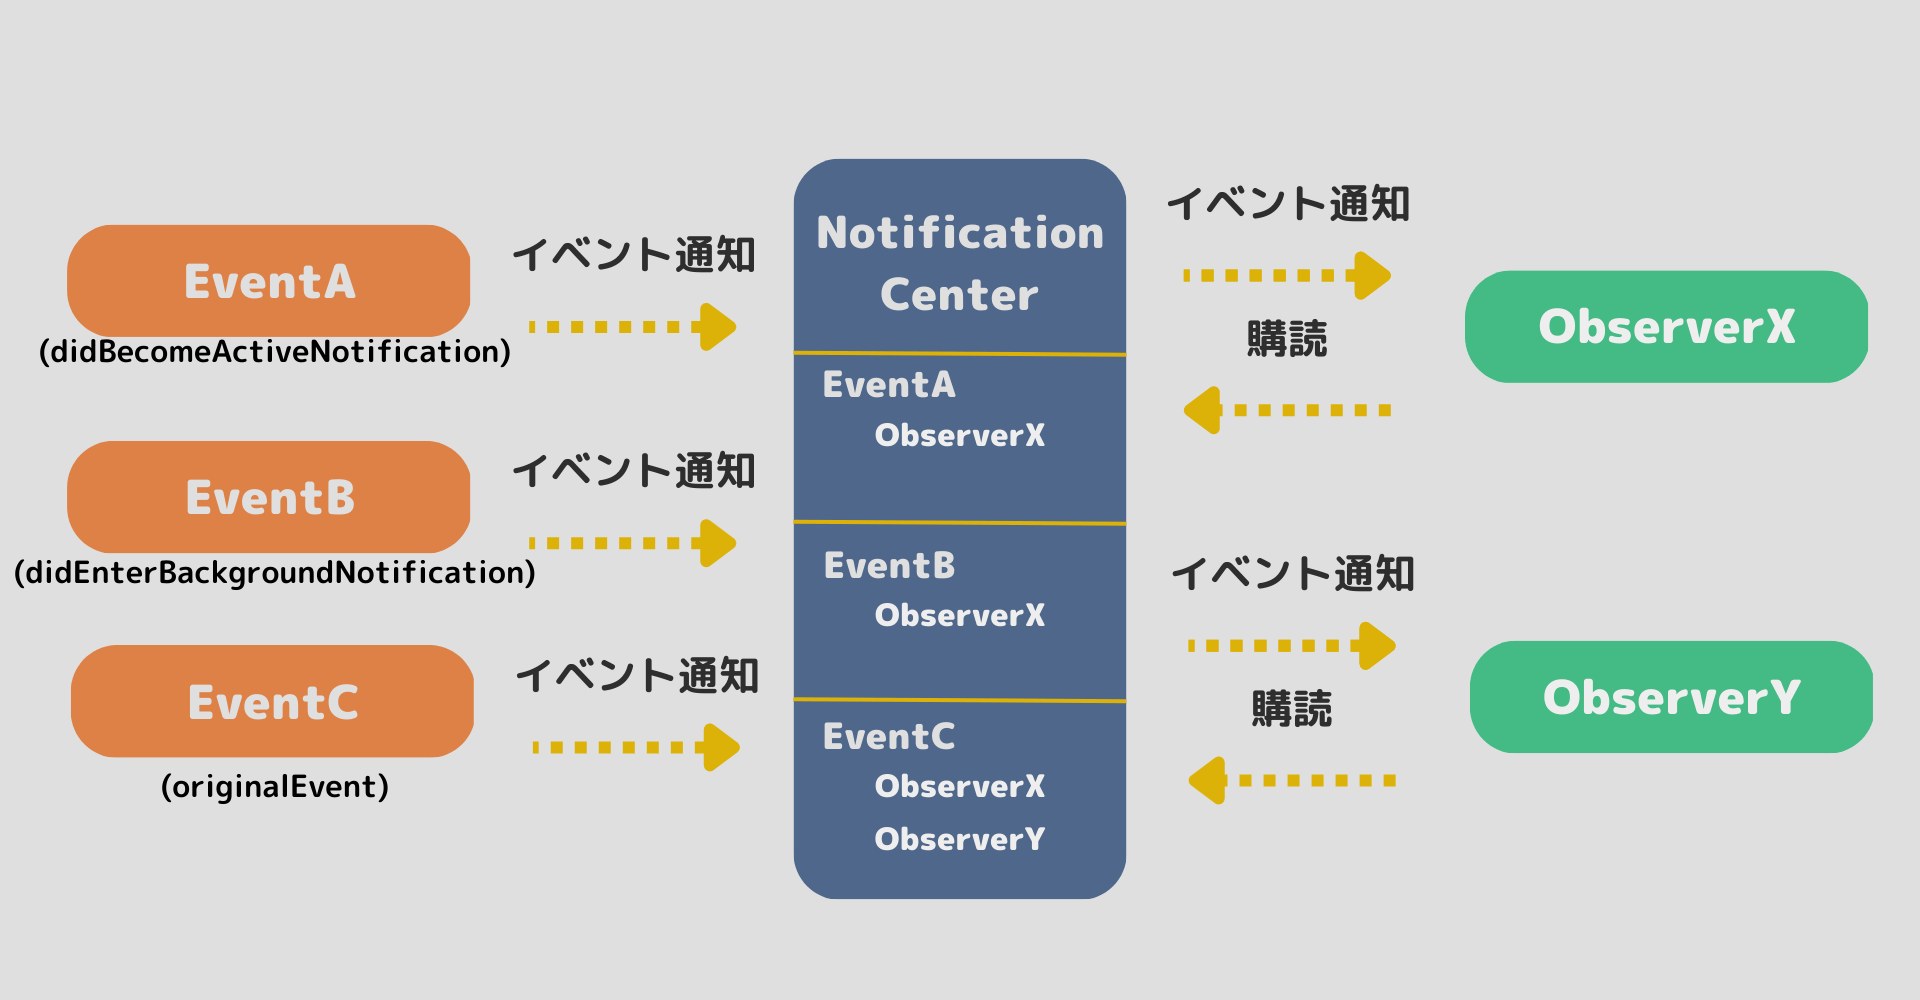
公式サイトの説明をみると「登録されたオブザーバーへのブロードキャストを可能にする通知メカニズム」と記述されています。これは購読しているオブザーバー(観測者)に対してブロードキャスト(一斉に通知)することができるということです。つまりNotificationCenterクラスが「Broker(仲介人)」という役割を担っているのだと思います。
Broker(仲介人)としての仕事としてPublishからのイベント発生通知の受け取りと購読しているオブザーバーへの通知をこなしています。NotificationCenterクラス内ではイベントごとに名前空間が用意され、その名前空間ごとに購読するオブザーバーが管理されています。
使用目的
使用目的は「任意のイベントを検知して、別クラスの処理を実行(状態を更新)させること」です。ここでいうイベントは「アプリがアクティブになった時」や「バックグラウンドになった時」などだけでなく、オリジナルのイベントを定義することも可能になっています。
NotificationCenterの基本的なAPIの使い方
まずはObserverパターンのことは一度忘れてシンプルにNotificationCenterクラスのAPIを理解するために「アプリがアクティブになった際にデバッグエリアに文字を出力する」コードを見てみます。
class ViewController: UIViewController {

    override func viewDidLoad() {
        super.viewDidLoad()

        NotificationCenter.default.addObserver(
            self,
            selector: #selector(appDidBecomeActive),
            name: UIApplication.didBecomeActiveNotification,
            object: nil)
    }

    // 通知を受け取った時の処理
    @objc  func appDidBecomeActive(_ notification: Notification) {
        print("アクティブ")
    }
}
NotificationCenterクラスを使用してイベントを検知し、通知するためには以下の3つのポイントを抑えておきます。
- NotificationCenter.default
- addObserverメソッド
- NSNotification.Name型
NotificationCenter.default
open class var `default`: NotificationCenter { get }NotificationCenter.defaultは、NotificationCenterのシングルトンインスタンスを返します。NotificationCenterクラスがアプリ内で発生したイベントに対して購読している全てのObserverオブジェクトに対して通知を送ります。複数のObserverオブジェクトに対してイベント通知を共有する必要があるためシングルトンインスタンスを参照するのが基本となっています。
addObserverメソッド
addObserverメソッドはNotificationCenterに対してオブザーバーを追加するメソッドです。このメソッドを実行してオブザーバーを追加しておかないとイベントが発生しても何も起こらなくなってしまいます。
追加するのはNotificationCenter内に用意されるイベントごとの名前空間になるので追加時には追加したいイベントの名前空間を指定してあげる必要があります。その名前空間はNSNotification.Name型で指定しますが、これについては後述します。
定義されているaddObserverメソッドは引数違いで2種類あります。
addObserver(for Name: object: queue: using:)メソッド
公式リファレンス:addObserver(for Name: object: queue: using:)メソッド
func addObserver(
    forName name: NSNotification.Name?,
    object obj: Any?,
    queue: OperationQueue?,
    using block: @escaping  @Sendable (Notification) -> Void
) -> NSObjectProtocol
NotificationCenter.default.addObserver(
forName: UIApplication.didBecomeActiveNotification,
object: nil,
queue: nil) { Notification in
print("アクティブ")
}
addObserver(_:selector:name:object:)メソッド
公式リファレンス:addObserver(_:selector:name:object:)メソッド
func addObserver(
    _ observer: Any,
    selector aSelector: Selector,
    name aName: NSNotification.Name?,
    object anObject: Any?
)
NotificationCenter.default.addObserver(
self,
selector: #selector(appDidBecomeActive),
name: UIApplication.didBecomeActiveNotification,
object: nil)
NSNotification.Name型
検知したいイベントはNSNotification.Name型としてあらかじめ複数用意されています。よく使いそうなものだけリストアップしておきました。実際にはもっとたくさんあるので必要なものを探してみてください。
- UIApplication.didBecomeActiveNotification:アプリがアクティブになったことを通知する。
- UIApplication.willResignActiveNotification:アプリが非アクティブになることを通知する。
- UIApplication.didEnterBackgroundNotification:アプリがバックグラウンドに移行したことを通知する。
- UIApplication.willEnterForegroundNotification:アプリがフォアグラウンドに移行することを通知する。
- UIApplication.didReceiveMemoryWarningNotification:アプリがメモリ不足で警告を受けたことを通知する。
- UIDevice.orientationDidChangeNotification:デバイスの向きが変わったことを通知する。
- NSLocale.currentLocaleDidChangeNotification:現在のロケールが変更されたことを通知する。
- NSCalendar.dayChangedNotification:日が変わったことを通知する。
オリジナルのイベントを作成する
オリジナルイベントを作成するためにはまず独自の名前空間を用意する必要があります。Notification.Name型を拡張してタイププロパティ(static)として追加しておきます。
おすすめ記事:【Swift】プロパティの種類!ストアドプロパティやタイププロパティとは?
そしてviewDidLoad内でイベントの購読をするオブザーバーを追加しておきます。
extension Notification.Name {
    static let originalEvent = Notification.Name("originalEvent")
}

class ViewController: UIViewController {

    let eventName =  Notification.Name.originalEvent

    override func viewDidLoad() {
        super.viewDidLoad()

        let button = UIButton()
        button.backgroundColor = .orange
        button.setTitle("イベント発火", for: .normal)
        button.frame = CGRect(x: 0, y: 0, width: 200, height: 80)
        button.center = view.center
        button.addTarget(self, action: #selector(tappedButton), for: .touchUpInside)
        view.addSubview(button)

        NotificationCenter.default.addObserver(
            forName: eventName,
                    object: nil,
                    queue: nil) { Notification in
                        print("オリジナルイベント発生")
                    }
    }

    @objc  func tappedButton() {
        NotificationCenter.default.post(name: eventName, object: nil)
    }
}今回肝となるのはpostメソッドです。このメソッドが指定した名前空間のイベントを発火させる役割を持っているのでUIButtonのタップ時に実行されるようにしておきました。
その他のAPI
removeObserverメソッド
通知センターに登録されているオブザーバーを削除するメソッド。
publisherメソッド
Combineフレームワークと組み合わせて使用するためのPublisherを取得するメソッド。
NotificationCenter.default.publisher(for: UIApplication.didBecomeActiveNotification)
    .sink { _ in
        print("アプリがアクティブになった")
    }
    .store(in: &cancellables)
以下の記事で紹介しています。
Publish-Subscribeパターンに倣って設計してみる
では先程の「アプリがアクティブになった際にデバッグエリアに文字を出力する」コードをObserverパターン(Publish-Subscribeパターン)に倣って3つの登場人物を意識しながら設計してみたいと思います。
- Publish:イベント発生を検知して通知するクラス
- Broker:イベント通知と観測者を管理する場所(通知センター)
- Subscribe:イベント発生を購読し変化に応じて任意の処理を行うクラス
// MARK: - Publisher: イベント発生を検知して通知するクラス
class EventPublisher {

    static let shared = EventPublisher()

    // MARK: - NotificationCenter: イベント通知と観測者を管理する場所(通知センター)
    private let notificationCenter = NotificationCenter.default

    func startObserving() {
        // アプリがアクティブになったイベントを購読する
        notificationCenter.addObserver(self,
                                       selector: #selector(appDidBecomeActive),
                                       name: UIApplication.didBecomeActiveNotification,
                                       object: nil)
    }


    @objc  func appDidBecomeActive(notification: Notification) {
        // イベント通知を受け取ったら購読者に通知する
        notificationCenter.post(name: .appDidBecomeActive, object: nil)
    }
}

// MARK: - Subscriber: イベント発生を購読し変化に応じて任意の処理を行うクラス
class EventSubscriber {

    static let shared = EventSubscriber()

    // MARK: - NotificationCenter: イベント通知と観測者を管理する場所(通知センター)
    private let notificationCenter = NotificationCenter.default

    init(){
        notificationCenter.addObserver(self,
                               selector: #selector(receiveNotification),
                               name: .appDidBecomeActive,
                               object: nil)
    }

    @objc  func receiveNotification() {
        print("アプリがアクティブになったよ")
    }
}

// MARK: - Notification.Name拡張: 通知名の定義
extension Notification.Name {
    static let appDidBecomeActive = Notification.Name("appDidBecomeActive")
}
先ほどの3つの登場人物に当てはめると以下のようになります。
- イベント発生を検知して通知するクラス→EventPublisher
- イベント通知と観測者を管理する場所→NotificationCenter
- イベント発生を購読し変化に応じて任意の処理を行うクラス→EventSubscriber
特別なことは何もしていませんが、「EventPublisher」と「EventSubscriber」はお互いに干渉せず、「NotificationCenter」を通して操作されます。
ViewControllerに以下のように組み込むことで実際の動作を確認することができます。アプリを閉じたり再度開いたりしてみて文字が出力されるか確認してみてください。(以下だとアプリがアクティブになった際に出力されることがクラス名やメソッドから読み解けないのでダメですね)
import UIKit

class ViewController: UIViewController {

    override func viewDidLoad() {
        super.viewDidLoad()

        let _ = EventSubscriber.shared
        EventPublisher.shared.startObserving()
    }
}
まだまだ勉強中ですので間違っている点や至らぬ点がありましたら教えていただけると助かります。
ご覧いただきありがとうございました。