【SwiftUI】Alertの使い方!複数表示できない理由と解決法

この記事からわかること
- SwiftUIのAlertとは?
- ポップアップ表示の出し方
- ボタンのカスタマイズ方法
- 複数のアラートを表示させるには?
- alert(_:isPresented:presenting:actions:message:)の使い方
index
[open]
\ アプリをリリースしました /


SwiftUI:Alertの使い方
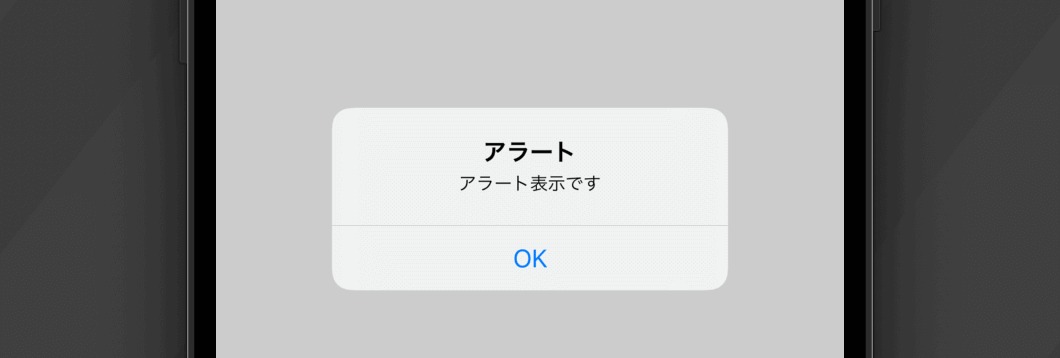
Swift UIで上記のようなポップアップアラートを表示させるにはビューに対してalertモディファイアを使用します。
func alert(
    isPresented: Binding<Bool>,
    content: () -> Alert
) -> some View引数isPresentedにはアラートの表示/非表示を切り替えるためのBool値を、contentにはAlert構造体を使って定義したアラート内容を渡します。
UIKitフレームワークを使用している場合はUIAlertControllerクラスを使用してアラートを実装します。
使用方法
「ボタンをクリックでアラート表示」する場合は以下のようになります。
struct ContentView: View {
    @State  var isAlert:Bool = false
    var body: some View {
        Button("アラート表示", action: {
            isAlert = true
        })
        .alert(isPresented: $isAlert) {
            Alert(title: Text("ここはタイトルです"),
                  message: Text("ここはメッセージです。"),
                  dismissButton: .default(Text("OK")))
        }
    }
}alertモディファイアを呼び出すのは対象のビューもしくはその親ビューでOKです。なのでButtonをVStackなどで囲った場合はVStackから呼び出しても正常に動作します。
Alert構造体
Alert構造体でアラートで表示させる文字やボタンテキスト、ボタンのアクション、色などを設定します。そのためにイニシャライザも複数用意されています。
ボタン1つのアラート表示
init(
    title: Text,
    message: Text? = nil,
    dismissButton: Alert.Button? = nil
)
ボタン2つのアラート表示
init(
    title: Text,
    message: Text? = nil,
    primaryButton: Alert.Button,
    secondaryButton: Alert.Button
)
Alert.Button
アラートで表示させるボタンはAlert.Buttonのメソッドを呼び出して定義します。destructiveで定義した場合のみ、ボタンの文字色が赤色になります。
基本的なボタンを作成
static func `default`(
    _ label: Text,
    action: (() -> Void)? = {}
) -> Alert.Button
キャンセルボタンを作成
static func cancel(
    _ label: Text,
    action: (() -> Void)? = {}
) -> Alert.Button
削除ボタンを作成(赤色)
static func destructive(
    _ label: Text,
    action: (() -> Void)? = {}
) -> Alert.Button
アラートを複数表示できない?
1つのView構造体の中に2つのアラートを設置して押されたボタンによって表示させるアラートを変更しようとします。しかしこの動作はうまく行きません。実際には上側に設置したアラートのみ表示され、下側のアラートは表示されません。
期待通りに動作しないコード
struct ContentView: View {
    @State  private var isAlert = false
    @State  private var isAlert2 = false

    var body: some View {
        VStack{
            Button("アラート1表示", action: {
                isAlert = true
            })

            // MARK: -
            Button("アラート2表示", action: {
                isAlert2 = true
            })

        }.alert(isPresented: $isAlert) {
            Alert(title: Text("アラート1"),
                  message: Text(""),
                  dismissButton: .default(Text("OK")))
        }
        // MARK: -
        .alert(isPresented: $isAlert2) {
            Alert(title: Text("アラート2"),
                  message: Text(""),
                  dismissButton: .default(Text("OK")))
        }
    }
}
現在のSwift UIのアラートの仕様では同階層に1つしかalertモディファイアを定義できないようです。
なので以下のように親ビューではなく、対象のビューから呼び出すようにすると正常に動作させることができます。
解決コード
struct ContentView: View {
    @State  private var isAlert = false
    @State  private var isAlert2 = false

    var body: some View {
        Button("アラート1表示", action: {
            isAlert = true
        })
        .alert(isPresented: $isAlert) {
            Alert(title: Text("アラート1"),
                  message: Text(""),
                  dismissButton: .default(Text("OK")))
        }
        // MARK: -
        Button("アラート2表示", action: {
            isAlert2 = true
        })
        .alert(isPresented: $isAlert2) {
            Alert(title: Text("アラート2"),
                  message: Text(""),
                  dismissButton: .default(Text("OK")))
        }
    }
}またalert(_:isPresented:actions:message:)を使用することでも解決できます。
非推奨になったAlert
ここまで紹介してきたalertモディファイアとAlert構造体ですが、Deprecated(非推奨)となってしまいました。
代わりにalert(_:isPresented:actions:message:)の使用が推奨されています。
alert(_:isPresented:actions:message:)
メソッド(モディファイア)名は同様の alertですが引数に渡す内容が異なります。ますば定義をみてみます。
定義
 func alert<S, A, M>(
    _ title: S,
    isPresented: Binding<Bool>,
    actions: () -> A,
    message: () -> M
) -> some View where S : StringProtocol, A : View, M : View
引数
- title:タイトル
- isPresented:表示/非表示のBool値
- actions:処理ビュー
- message:メッセージビュー
大きく変わったのはAlert構造体を使わずに引数としてそのまま処理を記述できるようになったことです。引数actionsに実際に処理を含んだビューを渡します。
使い方
struct ContentView: View {
    @State  private var isAlert = false

    var body: some View {
        Button("アラート1表示", action: {
            isAlert = true
        })
          .alert("アラートです", isPresented: $isAlert) {
              Button("OK") {
                  print("アラートが閉じられました。")
              }
          } message: {
              Text("メッセージ")
          }
    }
}デフォルトではOKボタンだけの表示になっており、キャンセルボタンや削除(destructive))ボタンを追加するにはButton構造体のrole属性から指定するようになっています。
var body: some View {
      Button("アラート1表示", action: {
          isAlert = true
      })
        .alert("アラートです", isPresented: $isAlert) {
            Button(role: .destructive) {
                print("アラートが閉じられました。")
            } label: {
                Text("Delete")
            }
        } message: {
            Text("メッセージ")
        }

}
複数ボタンの場合
Button("アラート1表示", action: {
    isAlert = true
}).alert("アラートです", isPresented: $isAlert) {
        Button(action: {
            print("OK")
        }, label: {
            Text("NG")
        })
        // MARK: -
        Button(action: {
            print("NG")
        }, label: {
            Text("OK")
        })
} message: {
    Text("メッセージ")
}
複数表示されない問題が解決
非推奨の方法では1つのビューに対して1つしかアラートを呼び出せませんでしたが、新しいコードを使用すると問題なく動作します。
期待通りのこー
struct ContentView: View {
@State private var isAlert = false
@State private var isAlert2 = false
var body: some View {
VStack{
Button("アラート1表示", action: {
isAlert = true
})
// MARK: -
Button("アラート2表示", action: {
isAlert2 = true
})
}.alert("アラート1", isPresented: $isAlert) {
Button("OK") {
print("")
}
} message: {
Text("")
}
// MARK: -
.alert("アラート2", isPresented: $isAlert2) {
Button("OK") {
print("")
}
} message: {
Text("")
}
}
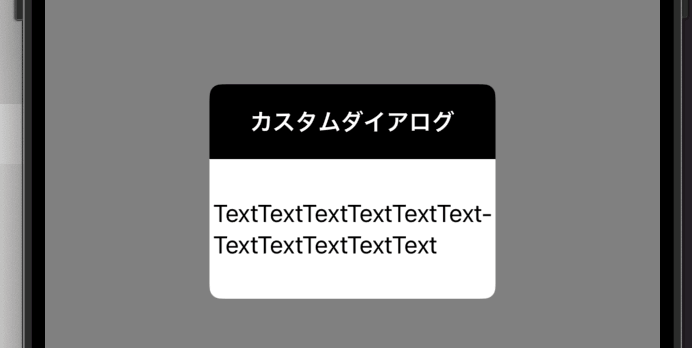
}カスタムアラートダイアログの実装
アラートのデザインは味気ないので自身でデザインしたアラートを実装することも可能です。詳細は以下の記事を参考にしてください。
まだまだ勉強中ですので間違っている点や至らぬ点がありましたら教えていただけると助かります。
ご覧いただきありがとうございました。
私がSwift UI学習に使用した参考書